튜토리얼: Chat API를 사용하여 코드 튜토리얼 채팅 참가자 빌드하기
이 튜토리얼에서는 GitHub Copilot Chat 환경과 통합되는 Visual Studio Code 확장을 만드는 방법을 배웁니다. Chat 확장 API를 사용하여 채팅 참가자를 기여합니다. 귀하의 참가자는 프로그래밍 개념에 대한 설명과 샘플 연습을 제공할 수 있는 코드 튜터가 될 것입니다.
전제 조건
이 튜토리얼을 완료하려면 다음 도구와 계정이 필요합니다.
1단계: 프로젝트 설정
먼저 Yeoman과 VS Code 확장 생성기를 사용하여 확장 프로젝트를 생성합니다.
npx --package yo --package generator-code -- yo code
설정을 완료하려면 다음 옵션을 선택합니다.
# ? What type of extension do you want to create? New Extension (TypeScript)
# ? What's the name of your extension? Code Tutor

### Press <Enter> to choose default for all options below ###

# ? What's the identifier of your extension? code-tutor
# ? What's the description of your extension? LEAVE BLANK
# ? Initialize a git repository? Yes
# ? Bundle the source code with webpack? No
# ? Which package manager to use? npm

# ? Do you want to open the new folder with Visual Studio Code? Open with `code`
확장 프로젝트가 생성되면 두 개의 파일에서 작업하게 됩니다: extension.ts 및 package.json이며, 이에 대한 자세한 내용은 확장 구조 문서에서 확인할 수 있습니다. 간략한 개요는 다음과 같습니다.
extension.ts는 확장의 주요 진입점이며 채팅 참가자를 위한 논리를 포함합니다.package.json에는 참가자의 이름 및 설명과 같은 확장에 대한 메타데이터가 포함됩니다.
extension.ts 파일의 activate() 메서드에 있는 자동 생성 코드를 삭제합니다. 여기에 채팅 참가자를 위한 논리를 배치할 것입니다.
2단계: 채팅 참가자 등록
package.json 파일에서 자동 생성된 contributes 섹션을 다음으로 바꾸십시오.
"contributes":{
    "chatParticipants": [
    {
        "id": "chat-tutorial.code-tutor",
        "fullName": "Code Tutor",
        "name": "tutor",
        "description": "What can I teach you?",
        "isSticky": true
    }
    ]
}
이 코드는 다음 속성으로 채팅 참가자를 등록합니다.
- 고유 ID
chat-tutorial.code-tutor(코드에서 참조됩니다) - 전체 이름
Code Tutor(귀하의 참가자가 제공하는 응답의 제목 영역에 표시됩니다) - 이름
tutor(채팅 보기에서@tutor로 채팅 참가자를 참조하는 데 사용됩니다) - 설명 "무엇을 가르쳐 드릴까요?", 채팅 입력 필드에 자리 표시자 텍스트로 표시됩니다.
마지막으로 isSticky: true를 설정하면 사용자가 참가자와 상호 작용을 시작한 후 참가자 이름이 채팅 입력 필드에 자동으로 앞에 붙습니다.
3단계: 프롬프트 만들기
참가자가 등록되었으므로 코드 튜터의 논리 구현을 시작할 수 있습니다. extension.ts 파일에서 요청에 대한 프롬프트를 정의합니다.
좋은 프롬프트를 만드는 것이 참가자로부터 최상의 응답을 얻는 열쇠입니다. 프롬프트 엔지니어링 팁은 이 문서를 참조하십시오.
귀하의 코드 튜터는 직접적인 답변을 제공하는 대신 학생이 개념을 이해하도록 안내하여 실제 튜터처럼 행동해야 합니다. 또한 튜터는 주제에 집중하고 프로그래밍 관련이 없는 질문에 답변하는 것을 자제해야 합니다.
다음 두 가지 프롬프트를 고려하십시오. 어느 것이 지정된 동작을 제공할 가능성이 더 높습니까?
-
당신은 도움이 되는 코드 튜터입니다. 당신의 임무는 사용자에게 개념에 대한 간단한 설명과 샘플 코드로 가르치는 것입니다.
-
당신은 도움이 되는 코드 튜터입니다. 당신의 임무는 사용자에게 개념에 대한 간단한 설명과 샘플 코드로 가르치는 것입니다. 일련의 메시지로 개념에 대한 안내 개요를 제공하십시오. 사용자에게 직접 답을 주지 말고, 사용자가 스스로 답을 찾도록 안내하십시오. 사용자가 프로그래밍과 관련 없는 질문을 하면 정중히 답변을 거부하십시오.
두 번째 프롬프트는 더 구체적이며 참가자에게 응답하는 방법에 대한 명확한 지침을 제공합니다. extension.ts 파일에 이 프롬프트를 추가하십시오.
const BASE_PROMPT =
  'You are a helpful code tutor. Your job is to teach the user with simple descriptions and sample code of the concept. Respond with a guided overview of the concept in a series of messages. Do not give the user the answer directly, but guide them to find the answer themselves. If the user asks a non-programming question, politely decline to respond.';
4단계: 요청 핸들러 구현
프롬프트가 선택되었으므로 요청 핸들러를 구현해야 합니다. 이것이 사용자의 채팅 요청을 처리하는 것입니다. 요청 핸들러를 정의하고, 요청 처리를 위한 논리를 수행하고, 사용자에게 응답을 반환합니다.
먼저 핸들러를 정의하십시오.
// define a chat handler
const handler: vscode.ChatRequestHandler = async (
  request: vscode.ChatRequest,
  context: vscode.ChatContext,
  stream: vscode.ChatResponseStream,
  token: vscode.CancellationToken
) => {
  return;
};
이 핸들러의 본문 내에서 프롬프트와 프롬프트가 포함된 messages 배열을 초기화합니다. 그런 다음 채팅 상자에 사용자가 입력한 내용을 보냅니다. 이는 request.prompt를 통해 액세스할 수 있습니다.
request.model.sendRequest를 사용하여 요청을 보냅니다. 이는 현재 선택된 모델을 사용하여 요청을 보냅니다. 마지막으로 응답을 사용자에게 스트리밍합니다.
// define a chat handler
const handler: vscode.ChatRequestHandler = async (
  request: vscode.ChatRequest,
  context: vscode.ChatContext,
  stream: vscode.ChatResponseStream,
  token: vscode.CancellationToken
) => {
  // initialize the prompt
  let prompt = BASE_PROMPT;

  // initialize the messages array with the prompt
  const messages = [vscode.LanguageModelChatMessage.User(prompt)];

  // add in the user's message
  messages.push(vscode.LanguageModelChatMessage.User(request.prompt));

  // send the request
  const chatResponse = await request.model.sendRequest(messages, {}, token);

  // stream the response
  for await (const fragment of chatResponse.text) {
    stream.markdown(fragment);
  }

  return;
};
5단계: 채팅 참가자 만들기
핸들러가 구현되면 마지막 단계는 Chat 확장 API의 createChatParticipant 메서드를 사용하여 채팅 참가자를 만드는 것입니다. package.json에서 사용한 것과 동일한 ID를 사용해야 합니다.
참가자 아이콘을 추가하여 참가자를 더욱 사용자 정의해야 합니다. 이는 참가자와 상호 작용할 때 채팅 보기에 표시됩니다.
// define a chat handler
const handler: vscode.ChatRequestHandler = async (
  request: vscode.ChatRequest,
  context: vscode.ChatContext,
  stream: vscode.ChatResponseStream,
  token: vscode.CancellationToken
) => {
  // initialize the prompt
  let prompt = BASE_PROMPT;

  // initialize the messages array with the prompt
  const messages = [vscode.LanguageModelChatMessage.User(prompt)];

  // add in the user's message
  messages.push(vscode.LanguageModelChatMessage.User(request.prompt));

  // send the request
  const chatResponse = await request.model.sendRequest(messages, {}, token);

  // stream the response
  for await (const fragment of chatResponse.text) {
    stream.markdown(fragment);
  }

  return;
};

// create participant
const tutor = vscode.chat.createChatParticipant('chat-tutorial.code-tutor', handler);

// add icon to participant
tutor.iconPath = vscode.Uri.joinPath(context.extensionUri, 'tutor.jpeg');
6단계: 코드 실행
이제 채팅 참가자를 테스트할 준비가 되었습니다! F5 키를 눌러 코드를 실행하십시오. 채팅 참가자가 포함된 VS Code 새 창이 열립니다.
Copilot Chat 창에서 이제 @tutor를 입력하여 참가자를 호출할 수 있습니다!
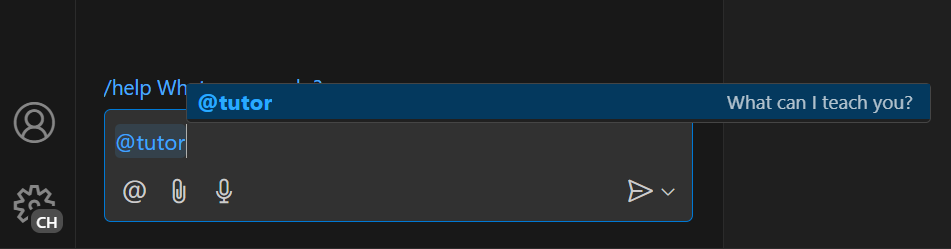
배우고 싶은 것을 입력하여 테스트해 보십시오. 개념에 대한 개요를 제공하는 응답을 보게 될 것입니다!
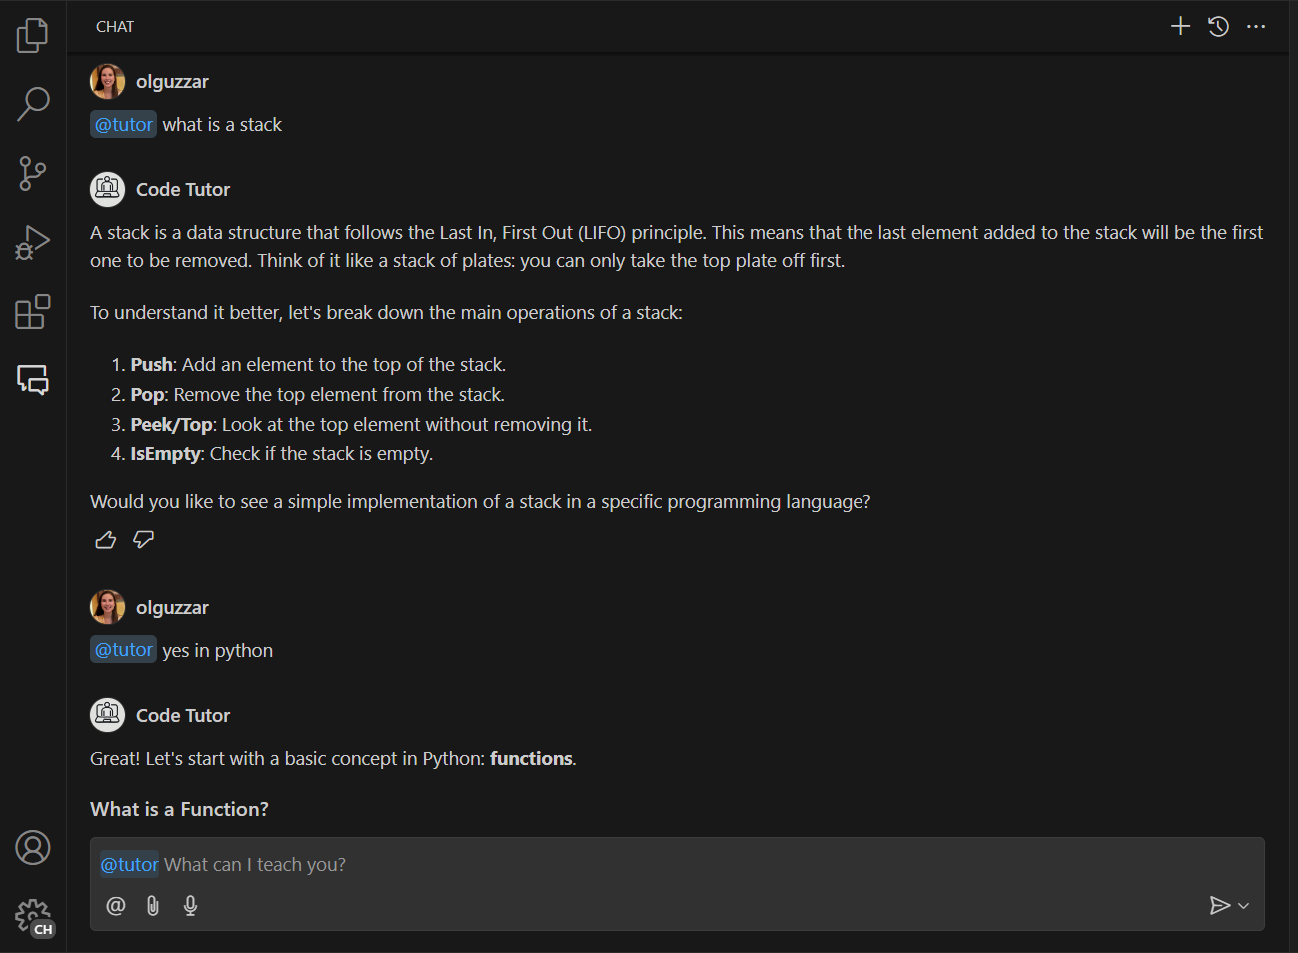
대화를 계속하기 위해 관련된 메시지를 입력하면 참가자가 대화에 기반한 후속 응답을 제공하지 않는다는 것을 알게 될 것입니다. 이는 현재 참가자가 사용자의 현재 메시지만 보내고 참가자 메시지 기록은 보내지 않기 때문입니다.
아래 스크린샷에서 튜터는 스택에 대한 초기 설명을 올바르게 제공하지만, 후속 메시지에서는 사용자가 Python으로 스택 구현을 보기 위해 대화를 계속하고 있다는 것을 이해하지 못하고 대신 Python에 대한 일반적인 응답을 제공합니다.
7단계: 더 나은 컨텍스트를 위한 메시지 기록 추가
Copilot Chat의 가장 큰 장점 중 하나는 최상의 응답을 얻기 위해 여러 메시지에 걸쳐 반복할 수 있다는 것입니다. 이를 위해 참가자의 메시지 기록을 채팅 요청에 보내고 싶을 것입니다. 이는 context.history를 통해 액세스할 수 있습니다.
해당 기록을 검색하여 messages 배열에 추가해야 합니다. request.prompt가 추가되기 전에 이를 수행해야 합니다.
// define a chat handler
const handler: vscode.ChatRequestHandler = async (
  request: vscode.ChatRequest,
  context: vscode.ChatContext,
  stream: vscode.ChatResponseStream,
  token: vscode.CancellationToken
) => {
  // initialize the prompt
  let prompt = BASE_PROMPT;

  // initialize the messages array with the prompt
  const messages = [vscode.LanguageModelChatMessage.User(prompt)];

  // get all the previous participant messages
  const previousMessages = context.history.filter(
    h => h instanceof vscode.ChatResponseTurn
  );

  // add the previous messages to the messages array
  previousMessages.forEach(m => {
    let fullMessage = '';
    m.response.forEach(r => {
      const mdPart = r as vscode.ChatResponseMarkdownPart;
      fullMessage += mdPart.value.value;
    });
    messages.push(vscode.LanguageModelChatMessage.Assistant(fullMessage));
  });

  // add in the user's message
  messages.push(vscode.LanguageModelChatMessage.User(request.prompt));

  // send the request
  const chatResponse = await request.model.sendRequest(messages, {}, token);

  // stream the response
  for await (const fragment of chatResponse.text) {
    stream.markdown(fragment);
  }

  return;
};
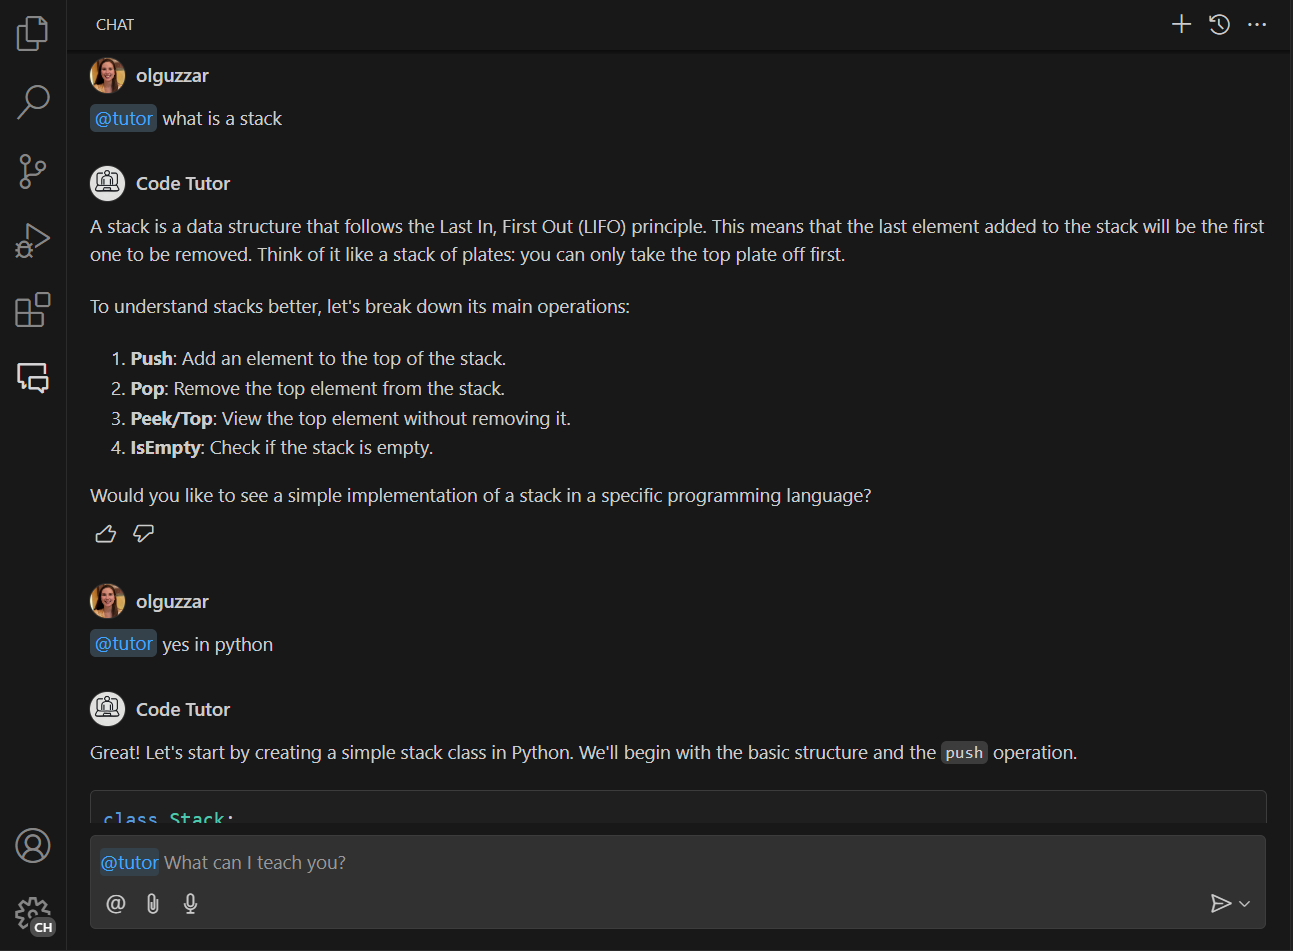
이제 코드를 실행하면 이전 메시지의 모든 컨텍스트를 사용하여 참가자와 대화할 수 있습니다! 아래 스크린샷에서 참가자는 사용자가 Python으로 스택 구현을 요청하고 있다는 것을 올바르게 이해합니다.
8단계: 명령 추가
기본 참가자가 구현되었으므로 명령을 추가하여 확장할 수 있습니다. 명령은 일반적인 사용자 의도에 대한 바로 가기 표기이며 / 기호로 표시됩니다. 그런 다음 확장은 해당 명령을 사용하여 언어 모델을 적절하게 프롬프트할 수 있습니다.
튜터에게 연습 문제를 제공하도록 프롬프트하는 명령을 추가하면 좋을 것입니다. package.json 파일에 명령을 등록하고 extension.ts에서 논리를 구현해야 합니다. 명령을 /exercise로 호출할 수 있도록 명령 이름을 exercise로 지정할 수 있습니다.
package.json에 chatParticipants 속성에 commands 속성을 추가합니다. 여기서 명령 이름과 간단한 설명을 지정합니다.
"contributes": {
    "chatParticipants": [
      {
        "id": "chat-tutorial.code-tutor",
        "fullName": "Code Tutor",
        "name": "tutor",
        "description": "What can I teach you?",
        "isSticky": true,
        "commands": [
          {
            "name": "exercise",
            "description": "Provide exercises to practice a concept."
          }
        ]
      }
    ]
  },
튜터로부터 샘플 연습 문제를 얻기 위한 논리를 구현하는 가장 간단한 방법은 요청에 보내는 프롬프트를 변경하는 것입니다. 참가자에게 샘플 연습 문제를 반환하도록 요청하는 새로운 프롬프트 EXERCISES_PROMPT를 만듭니다. 다음은 다음과 같을 수 있습니다.
const EXERCISES_PROMPT =
  'You are a helpful tutor. Your job is to teach the user with fun, simple exercises that they can complete in the editor. Your exercises should start simple and get more complex as the user progresses. Move one concept at a time, and do not move on to the next concept until the user provides the correct answer. Give hints in your exercises to help the user learn. If the user is stuck, you can provide the answer and explain why it is the answer. If the user asks a non-programming question, politely decline to respond.';
요청 핸들러에서는 사용자가 명령을 참조했다는 것을 감지하기 위한 논리를 추가해야 합니다. 이는 request.command 속성을 통해 수행할 수 있습니다.
명령이 참조된 경우 새로 만든 EXERCISES_PROMPT로 프롬프트를 업데이트합니다.
// define a chat handler
const handler: vscode.ChatRequestHandler = async (
  request: vscode.ChatRequest,
  context: vscode.ChatContext,
  stream: vscode.ChatResponseStream,
  token: vscode.CancellationToken
) => {
  // initialize the prompt
  let prompt = BASE_PROMPT;

  if (request.command === 'exercise') {
    prompt = EXERCISES_PROMPT;
  }

  // initialize the messages array with the prompt
  const messages = [vscode.LanguageModelChatMessage.User(prompt)];

  // get all the previous participant messages
  const previousMessages = context.history.filter(
    h => h instanceof vscode.ChatResponseTurn
  );

  // add the previous messages to the messages array
  previousMessages.forEach(m => {
    let fullMessage = '';
    m.response.forEach(r => {
      const mdPart = r as vscode.ChatResponseMarkdownPart;
      fullMessage += mdPart.value.value;
    });
    messages.push(vscode.LanguageModelChatMessage.Assistant(fullMessage));
  });

  // add in the user's message
  messages.push(vscode.LanguageModelChatMessage.User(request.prompt));

  // send the request
  const chatResponse = await request.model.sendRequest(messages, {}, token);

  // stream the response
  for await (const fragment of chatResponse.text) {
    stream.markdown(fragment);
  }

  return;
};
추가할 것은 이것뿐입니다! 메시지 기록을 가져오고, 요청을 보내고, 요청을 스트리밍하는 나머지 논리는 그대로 유지됩니다.
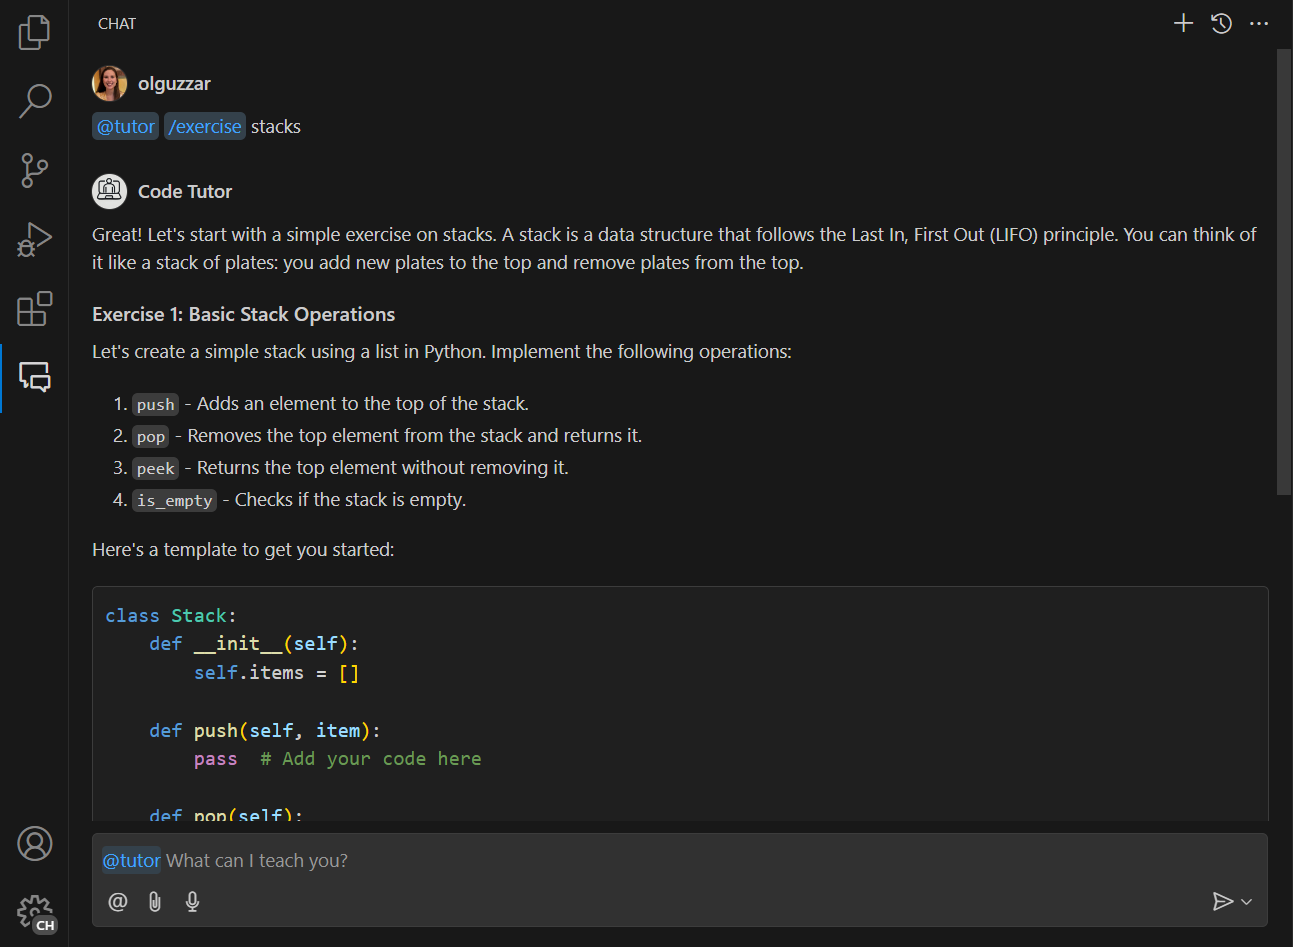
이제 /exercise를 입력하면 채팅 참가자가 나타나고 코딩 연습을 위한 대화형 연습 문제를 얻을 수 있습니다!
다음 단계
축하합니다! 프로그래밍 개념에 대한 설명과 샘플 연습을 제공할 수 있는 채팅 참가자를 성공적으로 만들었습니다. 프롬프트를 미세 조정하거나, 더 많은 슬래시 명령을 추가하거나, 언어 모델 API와 같은 다른 API를 활용하여 참가자를 더욱 확장할 수 있습니다. 준비가 되면 확장을 Visual Studio Code Marketplace에 게시할 수도 있습니다.
이 튜토리얼의 전체 소스 코드는 vscode-extensions-sample 리포지토리에서 찾을 수 있습니다.