기여 포인트
Contribution Points는 package.json 파일의 contributes 필드에 선언하는 JSON 세트입니다. Extension Manifest. 확장은 **Contribution Points**를 등록하여 Visual Studio Code 내의 다양한 기능을 확장합니다. 사용 가능한 **Contribution Points** 목록입니다.
authenticationbreakpointscolorscommandsconfigurationconfigurationDefaultscustomEditorsdebuggersgrammarsiconsiconThemesjsonValidationkeybindingslanguagesmenusproblemMatchersproblemPatternsproductIconThemesresourceLabelFormatterssemanticTokenModifierssemanticTokenScopessemanticTokenTypessnippetssubmenustaskDefinitionsterminalthemestypescriptServerPluginsviewsviewsContainersviewsWelcomewalkthroughs
contributes.authentication
인증 공급자를 기여합니다. 이렇게 하면 공급자에 대한 활성화 이벤트가 설정되고 확장 기능의 기능에 표시됩니다.
{
  "contributes": {
    "authentication": [
      {
        "label": "Azure DevOps",
        "id": "azuredevops"
      }
    ]
  }
}
contributes.breakpoints
일반적으로 디버거 확장은 contributes.breakpoints 항목도 포함하여 확장이 중단점 설정을 활성화할 언어 파일 형식을 나열합니다.
{
  "contributes": {
    "breakpoints": [
      {
        "language": "javascript"
      },
      {
        "language": "javascriptreact"
      }
    ]
  }
}
contributes.colors
새로운 테마 지정 가능한 색상을 기여합니다. 이러한 색상은 확장에서 편집기 장식 및 상태 표시줄에 사용할 수 있습니다. 정의되면 사용자는 workspace.colorCustomization 설정에서 색상을 사용자 지정할 수 있으며 사용자 테마는 색상 값을 설정할 수 있습니다.
{
  "contributes": {
    "colors": [
      {
        "id": "superstatus.error",
        "description": "Color for error message in the status bar.",
        "defaults": {
          "dark": "errorForeground",
          "light": "errorForeground",
          "highContrast": "#010203",
          "highContrastLight": "#feedc3"
        }
      }
    ]
  }
}
색상 기본값은 라이트, 다크 및 고대비 테마에 대해 정의할 수 있으며 기존 색상을 참조하거나 Color Hex Value일 수 있습니다.
확장은 ThemeColor API를 사용하여 새 테마 색상과 기존 테마 색상을 사용할 수 있습니다.
const errorColor = new vscode.ThemeColor('superstatus.error');
contributes.commands
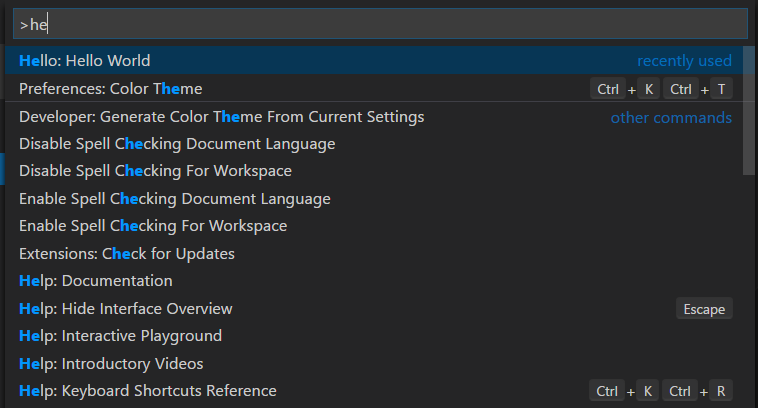
제목 및 (선택 사항) 아이콘, 카테고리, 사용 가능한 상태로 명령에 대한 UI를 기여합니다. 사용 가능 여부는 when 절로 표현됩니다. 기본적으로 명령은 **Command Palette** (⇧⌘P (Windows, Linux Ctrl+Shift+P))에 표시되지만 다른 메뉴에도 표시될 수 있습니다.
기여된 명령의 표현은 포함된 메뉴에 따라 달라집니다. 예를 들어 **Command Palette**는 명령 앞에 category를 붙여 쉽게 그룹화할 수 있습니다. 그러나 **Command Palette**는 아이콘이나 비활성화된 명령을 표시하지 않습니다. 반면에 편집기 컨텍스트 메뉴는 비활성화된 항목을 표시하지만 카테고리 레이블은 표시하지 않습니다.
참고: 명령이 호출될 때(키 바인딩, **Command Palette**, 다른 메뉴 또는 프로그래밍 방식으로), VS Code는 활성화 이벤트
onCommand:${command}를 내보냅니다.
참고: 제품 아이콘의 아이콘을 사용할 때
light및dark를 설정하면 아이콘이 비활성화됩니다. 올바른 구문은"icon": "$(book)"입니다.
command example
{
  "contributes": {
    "commands": [
      {
        "command": "extension.sayHello",
        "title": "Hello World",
        "category": "Hello",
        "icon": {
          "light": "path/to/light/icon.svg",
          "dark": "path/to/dark/icon.svg"
        }
      }
    ]
  }
}
VS Code 확장 기능에서 명령을 사용하는 방법에 대한 자세한 내용은 Commands Extension Guide를 참조하십시오.
Command icon specifications
Size:Icons should be 16x16 with a 1 pixel padding (image is 14x14) and centered.Color:Icons should use a single color.Format:It is recommended that icons be in SVG, though any image file type is accepted.
![]()
contributes.configuration
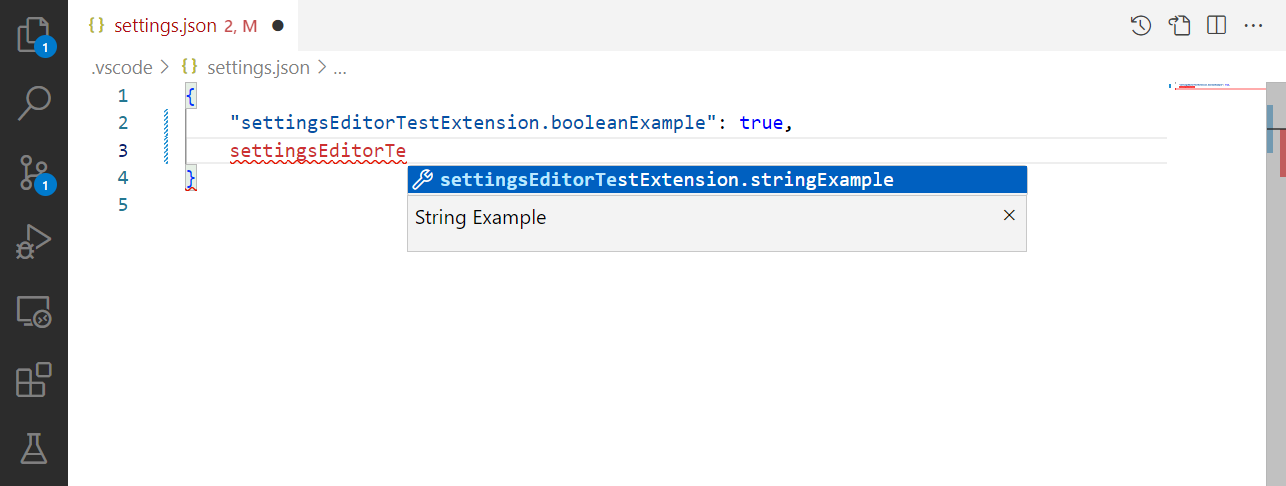
사용자에게 제공될 설정을 기여합니다. 사용자는 설정 편집기에서 또는 settings.json 파일을 직접 편집하여 이러한 구성 옵션을 설정할 수 있습니다.
이 섹션은 단일 설정 카테고리를 나타내는 단일 객체이거나 여러 설정 카테고리를 나타내는 객체 배열일 수 있습니다. 여러 설정 카테고리가 있는 경우 설정 편집기에는 해당 확장에 대한 테이블 콘텐츠에 하위 메뉴가 표시되고 제목 키는 하위 메뉴 항목 이름에 사용됩니다.
Configuration example
{
  "contributes": {
    "configuration": {
      "title": "Settings Editor Test Extension",
      "type": "object",
      "properties": {
        "settingsEditorTestExtension.booleanExample": {
          "type": "boolean",
          "default": true,
          "description": "Boolean Example"
        },
        "settingsEditorTestExtension.stringExample": {
          "type": "string",
          "default": "Hello World",
          "description": "String Example"
        }
      }
    }
  }
}
vscode.workspace.getConfiguration('myExtension')를 사용하여 확장 기능에서 이러한 값을 읽을 수 있습니다.
Configuration schema
구성 항목은 JSON 편집기에서 설정을 편집할 때 IntelliSense를 제공하고 설정 UI에 표시되는 방식을 정의하는 데 모두 사용됩니다.

title
카테고리의 title 1️⃣️는 해당 카테고리에 사용되는 헤더입니다.
{
  "configuration": {
    "title": "GitMagic"
  }
}
여러 설정 카테고리가 있는 확장 기능의 경우 카테고리 제목이 확장의 표시 이름과 같은 경우 설정 UI는 해당 카테고리를 "기본 카테고리"로 취급하여 해당 카테고리에 대한 order 필드를 무시하고 설정을 기본 확장 머리글 아래에 배치합니다.
title 및 displayName 필드 모두에서 "Extension", "Configuration", "Settings"와 같은 단어는 중복됩니다.
- ✔
"title": "GitMagic" - ❌
"title": "GitMagic Extension" - ❌
"title": "GitMagic Configuration" - ❌
"title": "GitMagic Extension Configuration Settings"
properties
configuration 객체의 properties는 키가 설정 ID이고 값이 설정에 대한 추가 정보를 제공하는 사전으로 구성됩니다. 확장은 여러 설정 카테고리를 포함할 수 있지만 확장 기능의 각 설정은 고유 ID를 가져야 합니다. 설정 ID는 다른 설정 ID의 전체 접두사가 될 수 없습니다.
명시적인 order 필드가 없는 속성은 설정 UI에 사전순으로 나타납니다(매니페스트에 나열된 순서가 아님).
Setting titles
설정 UI에서 여러 필드가 각 설정에 대한 표시 제목을 구성하는 데 사용됩니다. 키의 대문자는 단어 구분을 나타내는 데 사용됩니다.
Display titles for single-category and default category configurations
구성이 단일 카테고리의 설정을 포함하거나 카테고리가 확장의 표시 이름과 동일한 제목을 갖는 경우 해당 카테고리 내의 설정에 대해 설정 UI는 설정 ID와 확장 name 필드를 사용하여 표시 제목을 결정합니다.
예를 들어, 설정 ID gitMagic.blame.dateFormat 및 확장 이름 authorName.gitMagic의 경우 설정 ID의 접두사가 확장 이름의 접미사와 일치하므로 설정 ID의 gitMagic 부분이 표시 제목에서 제거됩니다: "Blame: Date Format".
Display titles for multi-category configurations
구성이 여러 설정 카테고리를 포함하고 카테고리가 확장의 표시 이름과 동일한 제목을 갖지 않는 경우 해당 카테고리 내의 설정에 대해 설정 UI는 설정 ID와 카테고리 id 필드를 사용하여 표시 제목을 결정합니다.
예를 들어, 설정 ID css.completion.completePropertyWithSemicolon 및 카테고리 ID css의 경우 설정 ID의 접두사가 카테고리 ID의 접미사와 일치하므로 설정 UI에서 css 부분이 제거되고 설정에 대한 생성된 제목은 "Completion: Complete Property With Semicolon"이 됩니다.
Configuration property schema
Configuration keys are defined using a superset of JSON Schema.
description / markdownDescription
description 3️⃣은 제목 뒤, 입력 필드 앞에 나타납니다. 부울의 경우 설명이 확인란의 레이블로 사용됩니다. 6️⃣
{
  "gitMagic.blame.heatMap.enabled": {
    "description": "Specifies whether to provide a heatmap indicator in the gutter blame annotations"
  }
}
description 대신 markdownDescription을 사용하면 설정 설명이 설정 UI에서 Markdown으로 구문 분석됩니다.
{
  "gitMagic.blame.dateFormat": {
    "markdownDescription": "Specifies how to format absolute dates (e.g. using the `${date}` token) in gutter blame annotations. See the [Moment.js docs](https://momentjs.com/docs/#/displaying/format/) for valid formats"
  }
}
markdownDescription의 경우 줄 바꿈이나 여러 단락을 추가하려면 단순히 \n 대신 \n\n 문자열을 사용하여 단락을 구분하십시오.
타입
number 4️⃣, string 5️⃣, boolean 6️⃣ 유형 항목은 설정 UI에서 직접 편집할 수 있습니다.
{
  "gitMagic.views.pageItemLimit": {
    "type": "number",
    "default": 20,
    "markdownDescription": "Specifies the number of items to show in each page when paginating a view list. Use 0 to specify no limit"
  }
}
문자열 설정은 구성 항목에서 "editPresentation": "multilineText"를 설정하면 여러 줄 텍스트 입력으로 렌더링될 수 있습니다.
boolean 항목의 경우 markdownDescription (markdownDescription이 지정되지 않은 경우 description)이 확인란 옆의 레이블로 사용됩니다.
{
  "gitMagic.blame.compact": {
    "type": "boolean",
    "description": "Specifies whether to compact (deduplicate) matching adjacent gutter blame annotations"
  }
}
일부 object 및 array 유형 설정은 설정 UI에 렌더링됩니다. number, string 또는 boolean의 간단한 배열은 편집 가능한 목록으로 렌더링됩니다. string, number, integer 및/또는 boolean 유형의 속성을 가진 객체는 편집 가능한 키-값 그리드로 렌더링됩니다. 개체 설정에는 UI에 렌더링되도록 additionalProperties가 false 또는 적절한 type 속성이 있는 객체로 설정되어야 합니다.
object 또는 array 유형 설정이 중첩된 객체, 배열 또는 null과 같은 다른 유형을 포함할 수도 있는 경우 해당 값은 설정 UI에 렌더링되지 않으며 JSON을 직접 편집하여 수정할 수만 있습니다. 사용자는 위의 스크린샷과 같이 **Edit in settings.json** 링크를 보게 됩니다. 8️⃣
order
카테고리와 해당 카테고리 내의 설정 모두 정수 order 유형 속성을 가질 수 있으며, 이는 다른 카테고리 및/또는 설정과 상대적으로 정렬되는 방식을 참조합니다.
두 카테고리에 order 속성이 있는 경우, 더 낮은 order 번호를 가진 카테고리가 먼저 옵니다. 카테고리에 order 속성이 지정되지 않으면 해당 속성이 지정된 카테고리 뒤에 나타납니다.
동일한 카테고리 내의 두 설정에 order 속성이 있는 경우, 더 낮은 order 번호를 가진 설정이 먼저 옵니다. 해당 카테고리 내의 다른 설정에 order 속성이 지정되지 않으면 해당 속성이 지정된 해당 카테고리의 설정 뒤에 나타납니다.
두 카테고리가 동일한 order 속성 값을 갖거나 동일한 카테고리 내의 두 설정이 동일한 order 속성 값을 갖는 경우, 설정 UI에서 사전순으로 오름차순으로 정렬됩니다.
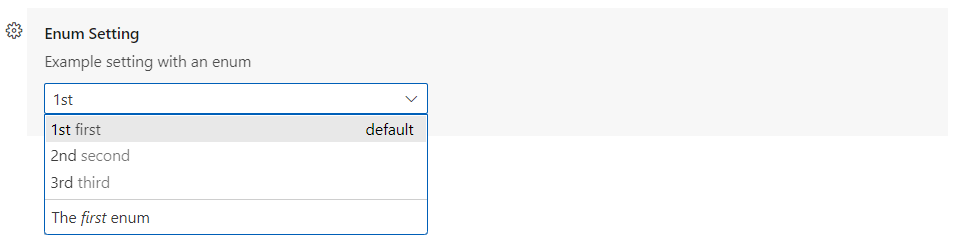
enum / enumDescriptions / markdownEnumDescriptions / enumItemLabels
enum 7️⃣ 속성 아래에 항목 배열을 제공하는 경우 설정 UI는 해당 항목의 드롭다운 메뉴를 렌더링합니다.
enumDescriptions 속성, 즉 enum 속성과 길이가 같은 문자열 배열을 제공할 수도 있습니다. enumDescriptions 속성은 각 enum 항목에 해당하는 드롭다운 메뉴 아래쪽에 설정 UI에 설명을 제공합니다.enumDescriptions 대신 markdownEnumDescriptions을 사용할 수도 있으며 설명은 Markdown으로 구문 분석됩니다. markdownEnumDescriptions은 enumDescriptions보다 우선합니다.
설정 UI에서 드롭다운 옵션 이름을 사용자 지정하려면 enumItemLabels를 사용할 수 있습니다.
예
{
  "settingsEditorTestExtension.enumSetting": {
    "type": "string",
    "enum": ["first", "second", "third"],
    "markdownEnumDescriptions": [
      "The *first* enum",
      "The *second* enum",
      "The *third* enum"
    ],
    "enumItemLabels": ["1st", "2nd", "3rd"],
    "default": "first",
    "description": "Example setting with an enum"
  }
}
deprecationMessage / markdownDeprecationMessage
deprecationMessage 또는 markdownDeprecationMessage를 설정하면 해당 설정에 지정된 메시지와 함께 경고 밑줄이 표시됩니다. 또한 설정은 사용자가 구성하지 않는 한 설정 UI에서 숨겨집니다. markdownDeprecationMessage를 설정하면 Markdown은 설정 호버 또는 문제 보기에 렌더링되지 않습니다. 두 속성을 모두 설정하면 deprecationMessage는 호버 및 문제 보기에 표시되고 markdownDeprecationMessage는 설정 UI에 Markdown으로 렌더링됩니다.
예
{
  "json.colorDecorators.enable": {
    "type": "boolean",
    "description": "Enables or disables color decorators",
    "markdownDeprecationMessage": "**Deprecated**: Please use `#editor.colorDecorators#` instead.",
    "deprecationMessage": "Deprecated: Please use editor.colorDecorators instead."
  }
}
Other JSON Schema properties
You can use any of the validation JSON Schema properties to describe other constraints on configuration values
defaultfor defining the default value of a propertyminimumandmaximumfor restricting numeric valuesmaxLength,minLengthfor restricting string lengthpatternfor restricting strings to a given regular expressionpatternErrorMessagefor giving a tailored error message when a pattern does not match.formatfor restricting strings to well-known formats, such asdate,time,ipv4,email, andurimaxItems,minItemsfor restricting array lengtheditPresentationfor controlling whether a single-line inputbox or multi-line textarea is rendered for the string setting in the Settings editor
Unsupported JSON Schema properties
Not supported in the configuration section are
$refanddefinition: The configuration schemas needs to be self-contained and cannot make assumptions how the aggregated settings JSON schema document looks like.
For more details on these and other features, see the JSON Schema Reference.
scope
A configuration setting can have one of the following possible scopes
application- Settings that apply to all instances of VS Code and can only be configured in user settings.machine- Machine specific settings that can be set only in user settings or only in remote settings. For example, an installation path which shouldn't be shared across machines. The value of these settings will not be synchronized.machine-overridable- Machine specific settings that can be overridden by workspace or folder settings. The value of these settings will not be synchronized.window- Windows (instance) specific settings which can be configured in user, workspace, or remote settings.resource- Resource settings, which apply to files and folders, and can be configured in all settings levels, even folder settings.language-overridable- Resource settings that can be overridable at a language level.
Configuration scopes determine when a setting is available to the user through the Settings editor and whether the setting is applicable. If no scope is declared, the default is window.
Below are example configuration scopes from the built-in Git extension
{
  "contributes": {
    "configuration": {
      "title": "Git",
      "properties": {
        "git.alwaysSignOff": {
          "type": "boolean",
          "scope": "resource",
          "default": false,
          "description": "%config.alwaysSignOff%"
        },
        "git.ignoredRepositories": {
          "type": "array",
          "default": [],
          "scope": "window",
          "description": "%config.ignoredRepositories%"
        },
        "git.autofetch": {
          "type": ["boolean", "string"],
          "enum": [true, false, "all"],
          "scope": "resource",
          "markdownDescription": "%config.autofetch%",
          "default": false,
          "tags": ["usesOnlineServices"]
        }
      }
    }
  }
}
You can see that git.alwaysSignOff has resource scope and can be set per user, workspace, or folder, while the ignored repositories list with window scope applies more globally for the VS Code window or workspace (which might be multi-root).
ignoreSync
You can set ignoreSync to true to prevent the setting from being synchronized with the user's settings. This is useful for settings that are not user-specific. For example, the remoteTunnelAccess.machineName setting is not user-specific and should not be synchronized. Please note that if you have set the scope to machine or machine-overridable, the setting will not be synchronized regardless of the value of ignoreSync.
{
  "contributes": {
    "configuration": {
      "properties": {
        "remoteTunnelAccess.machineName": {
          "type": "string",
          "default": "",
          "ignoreSync": true
        }
      }
    }
  }
}
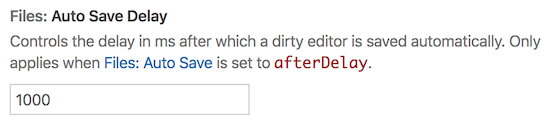
Linking to settings
You can insert a link to another setting, which will be rendered as a clickable link in the settings UI, by using this special syntax in the markdown-type properties: `#target.setting.id#`. This will work in markdownDescription, markdownEnumDescriptions, and markdownDeprecationMessage. Example
  "files.autoSaveDelay": {
    "markdownDescription": "Controls the delay in ms after which a dirty editor is saved automatically. Only applies when `#files.autoSave#` is set to `afterDelay`.",
    // ...
  }
In the settings UI, this is rendered as
contributes.configurationDefaults
Contribute default values for other registered configurations and override their defaults.
The following example overrides the default behavior of files.autoSave setting to AutoSave files on focus change.
"configurationDefaults": {
      "files.autoSave": "onFocusChange"
}
You can also contribute default editor configurations for the provided language. For example, the following snippet contributes default editor configurations for the markdown language
{
  "contributes": {
    "configurationDefaults": {
      "[markdown]": {
        "editor.wordWrap": "on",
        "editor.quickSuggestions": {
          "comments": "off",
          "strings": "off",
          "other": "off"
        }
      }
    }
  }
}
contributes.customEditors
customEditors contribution point는 확장이 VS Code에 제공하는 사용자 지정 편집기에 대해 알리는 방법입니다. 예를 들어 VS Code는 사용자 지정 편집기가 어떤 유형의 파일과 함께 작동하는지, 그리고 UI에서 사용자 지정 편집기를 어떻게 식별해야 하는지 알아야 합니다.
Here's a basic customEditor contribution for the custom editor extension sample
"contributes": {
  "customEditors": [
    {
      "viewType": "catEdit.catScratch",
      "displayName": "Cat Scratch",
      "selector": [
        {
          "filenamePattern": "*.cscratch"
        }
      ],
      "priority": "default"
    }
  ]
}
customEditors는 배열이므로 확장은 여러 사용자 지정 편집기를 기여할 수 있습니다.
-
viewType- 확정 편집기에 대한 고유 식별자입니다.This is how VS Code ties a custom editor contribution in the
package.jsonto your custom editor implementation in code. This must be unique across all extensions, so instead of a genericviewTypesuch as"preview"make sure to use one that is unique to your extension, for example"viewType": "myAmazingExtension.svgPreview". -
displayName- VS Code UI에서 사용자 지정 편집기를 식별하는 이름입니다.The display name is shown to the user in VS Code UI such as the View: Reopen with dropdown.
-
selector- 사용자 지정 편집기가 활성화될 파일을 지정합니다.selector는 하나 이상의 glob 패턴 배열입니다. 이러한 glob 패턴은 파일 이름과 일치하여 사용자 지정 편집기를 사용할 수 있는지 여부를 결정합니다.filenamePattern과 같은*.png는 모든 PNG 파일에 대해 사용자 지정 편집기를 활성화합니다.You can also create more specific patterns that match on file or directory names, for example
**/translations/*.json. -
priority- (선택 사항) 사용자 지정 편집기가 사용될 시기를 지정합니다.prioritycontrols when a custom editor is used when a resource is open. Possible values are"default"- Try to use the custom editor for every file that matches the custom editor'sselector. If there are multiple custom editors for a given file, the user will have to select which custom editor they want to use."option"- Do not use the custom editor by default but allow users to switch to it or configure it as their default.
You can learn more in the Custom Editors extension guide.
contributes.debuggers
VS Code에 디버거를 기여합니다. 디버거 기여에는 다음 속성이 있습니다.
typeis a unique ID that is used to identify this debugger in a launch configuration.labelis the user visible name of this debugger in the UI.programthe path to the debug adapter that implements the VS Code debug protocol against the real debugger or runtime.runtimeif the path to the debug adapter is not an executable but needs a runtime.configurationAttributesis the schema for launch configuration arguments specific to this debugger. Please note that the JSON schema constructs$refanddefinitionare not supported.initialConfigurationslists launch configurations that are used to populate an initial launch.json.configurationSnippetslists launch configurations that are available through IntelliSense when editing a launch.json.variablesintroduces substitution variables and binds them to commands implemented by the debugger extension.languagesthose languages for which the debug extension could be considered the "default debugger".
debugger example
{
  "contributes": {
    "debuggers": [
      {
        "type": "node",
        "label": "Node Debug",

        "program": "./out/node/nodeDebug.js",
        "runtime": "node",

        "languages": ["javascript", "typescript", "javascriptreact", "typescriptreact"],

        "configurationAttributes": {
          "launch": {
            "required": ["program"],
            "properties": {
              "program": {
                "type": "string",
                "description": "The program to debug."
              }
            }
          }
        },

        "initialConfigurations": [
          {
            "type": "node",
            "request": "launch",
            "name": "Launch Program",
            "program": "${workspaceFolder}/app.js"
          }
        ],

        "configurationSnippets": [
          {
            "label": "Node.js: Attach Configuration",
            "description": "A new configuration for attaching to a running node program.",
            "body": {
              "type": "node",
              "request": "attach",
              "name": "${2:Attach to Port}",
              "port": 9229
            }
          }
        ],

        "variables": {
          "PickProcess": "extension.node-debug.pickNodeProcess"
        }
      }
    ]
  }
}
For a full walkthrough on how to integrate a debugger, go to Debugger Extension.
contributes.grammars
언어에 TextMate 문법을 기여합니다. 해당 문법이 적용되는 language, 문법의 TextMate scopeName 및 파일 경로를 제공해야 합니다.
참고: 문법을 포함하는 파일은 JSON(파일 이름이 .json으로 끝남) 또는 XML plist 형식(다른 모든 파일)일 수 있습니다.
grammar example
{
  "contributes": {
    "grammars": [
      {
        "language": "markdown",
        "scopeName": "text.html.markdown",
        "path": "./syntaxes/markdown.tmLanguage.json",
        "embeddedLanguages": {
          "meta.embedded.block.frontmatter": "yaml"
        }
      }
    ]
  }
}
구문 강조 표시를 받기 위해 언어와 관련된 TextMate 문법을 등록하는 방법에 대한 자세한 내용은 Syntax Highlight Guide를 참조하십시오.
contributes.icons
ID와 기본 아이콘으로 새 아이콘을 기여합니다. 이 아이콘 ID는 확장 프로그램(또는 해당 확장에 의존하는 다른 확장 프로그램)에서 ThemeIcon을 사용할 수 있는 모든 곳에서 new ThemeIcon("iconId"), Markdown 문자열($(iconId)) 및 특정 기여 포인트의 아이콘으로 사용할 수 있습니다.
{
  "contributes": {
    "icons": {
      "distro-ubuntu": {
        "description": "Ubuntu icon",
        "default": {
          "fontPath": "./distroicons.woff",
          "fontCharacter": "\\E001"
        }
      },
      "distro-fedora": {
        "description": "Ubuntu icon",
        "default": {
          "fontPath": "./distroicons.woff",
          "fontCharacter": "\\E002"
        }
      }
    }
  }
}
contributes.iconThemes
VS Code에 파일 아이콘 테마를 기여합니다. 파일 아이콘은 파일 이름 옆에 표시되어 파일 유형을 나타냅니다.
ID(설정에서 사용됨), 레이블 및 파일 아이콘 정의 파일 경로를 지정해야 합니다.
file icon theme example
{
  "contributes": {
    "iconThemes": [
      {
        "id": "my-cool-file-icons",
        "label": "Cool File Icons",
        "path": "./fileicons/cool-file-icon-theme.json"
      }
    ]
  }
}
![]()
파일 아이콘 테마를 만드는 방법은 File Icon Theme Guide를 참조하십시오.
contributes.jsonValidation
특정 유형의 json 파일에 대한 유효성 검사 스키마를 기여합니다. url 값은 확장 기능에 포함된 스키마 파일의 로컬 경로이거나 json schema store와 같은 원격 서버 URL일 수 있습니다.
{
  "contributes": {
    "jsonValidation": [
      {
        "fileMatch": ".jshintrc",
        "url": "https://json.schemastore.org/jshintrc"
      }
    ]
  }
}
contributes.keybindings
사용자가 키 조합을 누를 때 호출되어야 하는 명령을 정의하는 키 바인딩 규칙을 기여합니다. 키 바인딩에 대해 자세히 설명하는 Key Bindings 항목을 참조하십시오.
키 바인딩을 기여하면 기본 키보드 바로 가기 키에 해당 규칙이 표시되고 명령의 모든 UI 표현에 추가된 키 바인딩이 표시됩니다. 물론 사용자가 키 조합을 누르면 명령이 호출됩니다.
참고: VS Code는 Windows, macOS 및 Linux에서 실행되며 수정자가 다르므로 "key"를 사용하여 기본 키 조합을 설정하고 특정 플랫폼으로 덮어쓸 수 있습니다.
참고: 명령이 호출될 때(키 바인딩 또는 Command Palette에서), VS Code는 활성화 이벤트
onCommand:${command}를 내보냅니다.
keybinding example
Windows 및 Linux에서 Ctrl+F1, macOS에서 Cmd+F1이 "extension.sayHello" 명령을 트리거하도록 정의
{
  "contributes": {
    "keybindings": [
      {
        "command": "extension.sayHello",
        "key": "ctrl+f1",
        "mac": "cmd+f1",
        "when": "editorTextFocus"
      }
    ]
  }
}
contributes.languages
프로그래밍 언어 정의를 기여합니다. 이렇게 하면 새 언어가 도입되거나 VS Code가 언어에 대해 알고 있는 지식이 강화됩니다.
contributes.languages의 주요 효과는 다음과 같습니다.
languageId를 정의하여 VS Code API의 다른 부분(예:vscode.TextDocument.languageId및onLanguage활성화 이벤트)에서 재사용할 수 있습니다.aliases필드를 사용하여 사람이 읽을 수 있는 이름을 기여할 수 있습니다. 목록의 첫 번째 항목이 사람이 읽을 수 있는 레이블로 사용됩니다.
- 파일 확장자(
extensions), 파일 이름(filenames), 파일 이름 glob 패턴(filenamePatterns), 특정 줄(예: 해시뱅)로 시작하는 파일(firstLine) 및mimetypes를 해당languageId에 연결합니다. - 기여된 언어에 대한 선언적 언어 기능 세트를 기여합니다. 구성 가능한 편집 기능에 대한 자세한 내용은 Language Configuration Guide를 참조하십시오.
- 파일 아이콘 테마에서 테마에 언어에 대한 아이콘이 없는 경우 사용할 수 있는 아이콘을 기여합니다.
language example
{
  "contributes": {
    "languages": [
      {
        "id": "python",
        "extensions": [".py"],
        "aliases": ["Python", "py"],
        "filenames": [],
        "firstLine": "^#!/.*\\bpython[0-9.-]*\\b",
        "configuration": "./language-configuration.json",
        "icon": {
          "light": "./icons/python-light.png",
          "dark": "./icons/python-dark.png"
        }
      }
    ]
  }
}
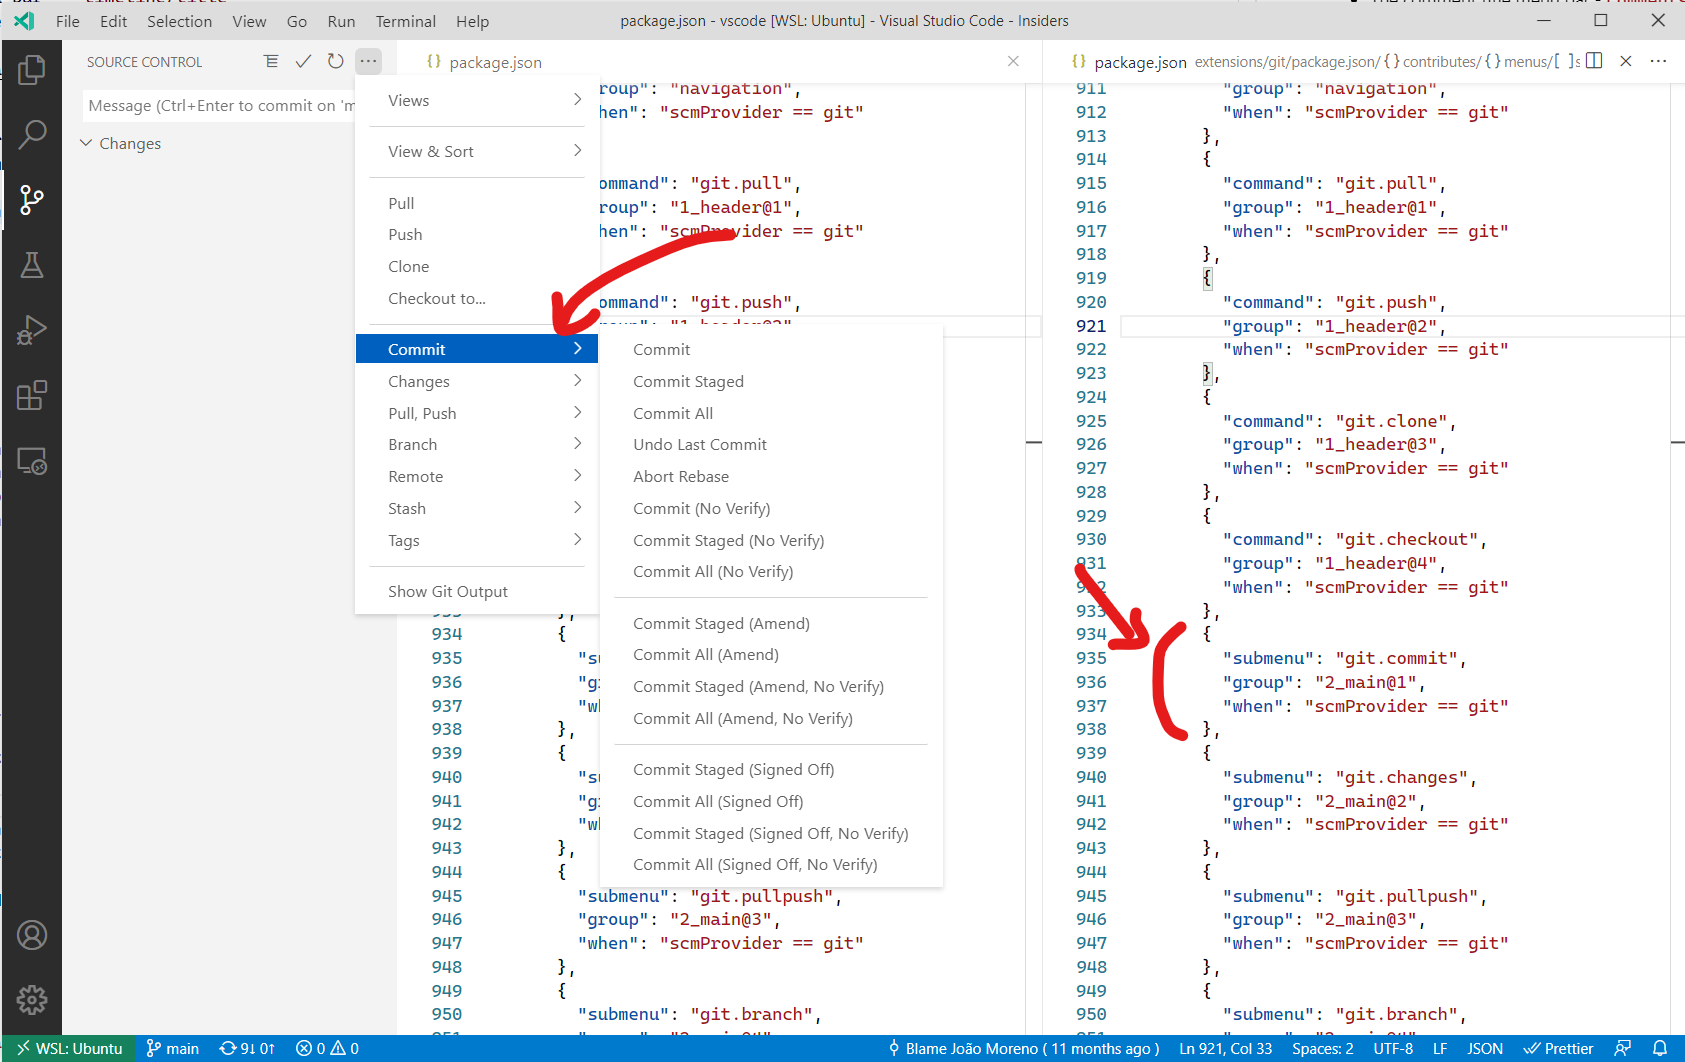
contributes.menus
편집기 또는 탐색기에 명령에 대한 메뉴 항목을 기여합니다. 메뉴 항목 정의에는 선택 시 호출되어야 하는 명령과 해당 항목이 표시되어야 하는 조건이 포함됩니다. 후자는 키 바인딩 when 절 컨텍스트를 사용하는 when 절로 정의됩니다.
command 속성은 메뉴 항목을 선택할 때 실행할 명령을 나타냅니다. submenu 속성은 이 위치에 렌더링할 하위 메뉴를 나타냅니다.
command 메뉴 항목을 선언할 때 alt 속성을 사용하여 대체 명령을 정의할 수도 있습니다. 메뉴를 열 때 Alt 키를 누르면 표시되고 호출됩니다. Windows 및 Linux에서는 Shift도 이 작업을 수행하며, 이는 Alt가 창 메뉴 표시줄을 트리거할 수 있는 상황에 유용합니다.
마지막으로 group 속성은 메뉴 항목의 정렬 및 그룹화를 정의합니다. navigation 그룹은 항상 메뉴의 맨 위/시작 부분으로 정렬되는 특별한 그룹입니다.
참고:
when절은 메뉴에 적용되고enablement절은 명령에 적용됩니다.enablement는 모든 메뉴와 키 바인딩에 적용되는 반면when은 단일 메뉴에만 적용됩니다.
Currently extension writers can contribute to
commandPalette- global Command Palettecomments/comment/title- Comments title menu barcomments/comment/context- Comments context menucomments/commentThread/title- Comments thread title menu barcomments/commentThread/context- Comments thread context menudebug/callstack/context- Debug Call Stack view context menudebug/callstack/contextgroupinline- Debug Call Stack view inline actionsdebug/toolBar- Debug view toolbardebug/variables/context- Debug Variables view context menueditor/context- editor context menueditor/lineNumber/context- editor line number context menueditor/title- editor title menu bareditor/title/context- editor title context menueditor/title/run- Run submenu on the editor title menu barexplorer/context- Explorer view context menuextension/context- Extensions view context menufile/newFile- New File item in the File menu and Welcome pageinteractive/toolbar- Interactive Window toolbarinteractive/cell/title- Interactive Window cell title menu barnotebook/toolbar- notebook toolbarnotebook/cell/title- notebook cell title menu barnotebook/cell/execute- notebook cell execution menuscm/title- SCM title menuscm/resourceGroup/context- SCM resource groups menusscm/resourceFolder/context- SCM resource folders menusscm/resourceState/context- SCM resources menusscm/change/title- SCM change title menusscm/repository- SCM repository menuscm/sourceControl- SCM source control menuterminal/context- terminal context menuterminal/title/context- terminal title context menutesting/item/context- Test Explorer item context menutesting/item/gutter- menu for a gutter decoration for a test itemtimeline/title- Timeline view title menu bartimeline/item/context- Timeline view item context menutouchBar- macOS Touch Barview/title- View title menuview/item/context- View item context menuwebview/context- any webview context menu- Any contributed submenu
참고 1: (컨텍스트) 메뉴에서 명령이 호출될 때 VS Code는 현재 선택된 리소스를 추론하려고 시도하고 명령을 호출할 때 매개변수로 전달합니다. 예를 들어, 탐색기 내부의 메뉴 항목에는 선택한 리소스의 URI가 전달되고 편집기 내부의 메뉴 항목에는 문서의 URI가 전달됩니다.
참고 2:
editor/lineNumber/context에 기여된 메뉴 항목의 명령에는 줄 번호도 전달됩니다. 또한 이러한 항목은when절에서editorLineNumber컨텍스트 키를 참조할 수 있습니다. 예를 들어 확장 프로그램에서 관리하는 배열 값 컨텍스트 키에 대해 테스트하기 위해in또는not in연산자를 사용하여 테스트할 수 있습니다.
제목 외에도 기여된 명령은 호출 메뉴 항목이 단추로 표시될 때(예: 제목 메뉴 표시줄) VS Code가 표시하는 아이콘을 지정할 수 있습니다.
menu example
Here's a command menu item
{
  "contributes": {
    "menus": {
      "editor/title": [
        {
          "when": "resourceLangId == markdown",
          "command": "markdown.showPreview",
          "alt": "markdown.showPreviewToSide",
          "group": "navigation"
        }
      ]
    }
  }
}
마찬가지로, 여기에 특정 보기에 추가된 명령 메뉴 항목이 있습니다. 아래 예제는 임의의 보기(예: 터미널)에 기여합니다.
{
  "contributes": {
    "menus": {
      "view/title": [
        {
          "command": "terminalApi.sendText",
          "when": "view == terminal",
          "group": "navigation"
        }
      ]
    }
  }
}
Here's a submenu menu item
{
  "contributes": {
    "menus": {
      "scm/title": [
        {
          "submenu": "git.commit",
          "group": "2_main@1",
          "when": "scmProvider == git"
        }
      ]
    }
  }
}
Context specific visibility of Command Palette menu items
package.json에 명령을 등록할 때 명령은 자동으로 **Command Palette**(⇧⌘P (Windows, Linux Ctrl+Shift+P))에 표시됩니다. 명령 가시성에 대한 더 많은 제어를 위해 commandPalette 메뉴 항목이 있습니다. 이를 통해 명령이 **Command Palette**에 보일지 여부를 제어하는 when 조건을 정의할 수 있습니다.
아래 스니펫은 'Hello World' 명령이 편집기에서 무언가가 선택되었을 때만 **Command Palette**에 보이도록 합니다.
{
  "commands": [
    {
      "command": "extension.sayHello",
      "title": "Hello World"
    }
  ],
  "menus": {
    "commandPalette": [
      {
        "command": "extension.sayHello",
        "when": "editorHasSelection"
      }
    ]
  }
}
Sorting of groups
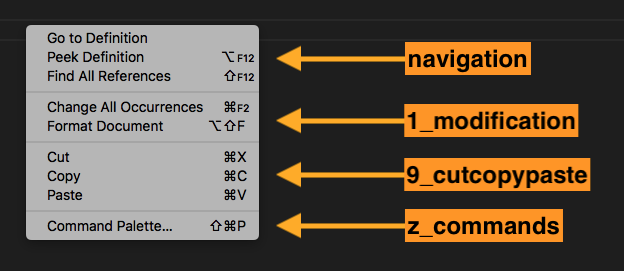
메뉴 항목은 그룹으로 정렬될 수 있습니다. 다음 기본값/규칙에 따라 사전순으로 정렬됩니다. 이러한 그룹에 메뉴 항목을 추가하거나 사이에, 아래에 또는 위에 새 그룹을 추가할 수 있습니다.
The editor context menu has these default groups
navigation- Thenavigationgroup comes first in all cases.1_modification- This group comes next and contains commands that modify your code.9_cutcopypaste- The second last default group with the basic editing commands.z_commands- The last default group with an entry to open the Command Palette.
The explorer context menu has these default groups
navigation- Commands related to navigation across VS Code. This group comes first in all cases.2_workspace- Commands related to workspace manipulation.3_compare- diff 편집기에서 파일을 비교하는 명령어입니다.4_search- 검색 보기에서 검색하는 명령어입니다.5_cutcopypaste- 파일의 잘라내기, 복사, 붙여넣기와 관련된 명령어입니다.6_copypath- 파일 경로 복사와 관련된 명령어입니다.7_modification- 파일 수정과 관련된 명령어입니다.
편집기 탭 컨텍스트 메뉴에는 다음과 같은 기본 그룹이 있습니다.
1_close- 편집기를 닫는 명령어입니다.3_preview- 편집기를 고정하는 명령어입니다.
편집기 제목 메뉴에는 다음과 같은 기본 그룹이 있습니다.
navigation- 탐색 관련 명령어입니다.1_run- 편집기를 실행하고 디버깅하는 명령어입니다.1_diff- diff 편집기를 작업하는 명령어입니다.3_open- 편집기를 여는 명령어입니다.5_close- 편집기를 닫는 명령어입니다.
navigation과 1_run은 기본 편집기 제목 영역에 표시됩니다. 다른 그룹은 ... 메뉴 아래의 보조 영역에 표시됩니다.
터미널 탭 컨텍스트 메뉴에는 다음과 같은 기본 그룹이 있습니다.
1_create- 터미널을 생성하는 명령어입니다.3_run- 터미널에서 무언가를 실행/실행하는 명령어입니다.5_manage- 터미널을 관리하는 명령어입니다.7_configure- 터미널 구성을 위한 명령어입니다.
터미널 컨텍스트 메뉴에는 다음과 같은 기본 그룹이 있습니다.
1_create- 터미널을 생성하는 명령어입니다.3_edit- 텍스트, 선택 또는 클립보드를 조작하는 명령어입니다.5_clear- 터미널을 지우는 명령어입니다.7_kill- 터미널을 닫거나 종료하는 명령어입니다.9_config- 터미널 구성 관련 명령어입니다.
타임라인 보기 항목 컨텍스트 메뉴에는 다음과 같은 기본 그룹이 있습니다.
inline- 중요하거나 자주 사용되는 타임라인 항목 명령어입니다. 툴바로 렌더링됩니다.1_actions- 타임라인 항목을 작업하는 명령어입니다.5_copy- 타임라인 항목 정보를 복사하는 명령어입니다.
확장 보기 컨텍스트 메뉴에는 다음과 같은 기본 그룹이 있습니다.
1_copy- 확장 정보를 복사하는 명령어입니다.2_configure- 확장을 구성하는 명령어입니다.
그룹 내 정렬
그룹 내 순서는 제목 또는 order-attribute에 따라 달라집니다. 메뉴 항목의 그룹별 순서는 아래와 같이 그룹 식별자에 @<숫자>를 추가하여 지정합니다.
{
  "editor/title": [
    {
      "when": "editorHasSelection",
      "command": "extension.Command",
      "group": "myGroup@1"
    }
  ]
}
contributes.problemMatchers
문제 매처 패턴을 기여합니다. 이러한 기여는 출력 패널 실행기와 터미널 실행기 모두에서 작동합니다. 다음은 확장에서 gcc 컴파일러에 대한 문제 매처를 기여하는 예입니다.
{
  "contributes": {
    "problemMatchers": [
      {
        "name": "gcc",
        "owner": "cpp",
        "fileLocation": ["relative", "${workspaceFolder}"],
        "pattern": {
          "regexp": "^(.*):(\\d+):(\\d+):\\s+(warning|error):\\s+(.*)$",
          "file": 1,
          "line": 2,
          "column": 3,
          "severity": 4,
          "message": 5
        }
      }
    ]
  }
}
이 문제 매처는 이제 tasks.json 파일에서 $gcc라는 이름 참조를 통해 사용할 수 있습니다. 예는 다음과 같습니다.
{
  "version": "2.0.0",
  "tasks": [
    {
      "label": "build",
      "command": "gcc",
      "args": ["-Wall", "helloWorld.c", "-o", "helloWorld"],
      "problemMatcher": "$gcc"
    }
  ]
}
또한 다음을 참조하세요: 문제 매처 정의
contributes.problemPatterns
문제 매처(위 참조)에서 사용할 수 있는 명명된 문제 패턴을 기여합니다.
contributes.productIconThemes
VS Code에 제품 아이콘 테마를 기여합니다. 제품 아이콘은 파일 아이콘과 확장 프로그램에서 기여한 아이콘을 제외한 VS Code에서 사용되는 모든 아이콘입니다.
설정에서 사용될 ID, 레이블, 아이콘 정의 파일 경로를 지정해야 합니다.
제품 아이콘 테마 예제
{
  "contributes": {
    "productIconThemes": [
      {
        "id": "elegant",
        "label": "Elegant Icon Theme",
        "path": "./producticons/elegant-product-icon-theme.json"
      }
    ]
  }
}
![]()
제품 아이콘 테마를 만드는 방법에 대한 제품 아이콘 테마 가이드를 참조하세요.
contributes.resourceLabelFormatters
워크벤치 어디에서나 URI를 표시하는 방법을 지정하는 리소스 레이블 포맷터를 기여합니다. 예를 들어, 확장 프로그램이 remotehub 스키마를 가진 URI에 대한 포맷터를 기여하는 방법은 다음과 같습니다.
{
  "contributes": {
    "resourceLabelFormatters": [
      {
        "scheme": "remotehub",
        "formatting": {
          "label": "${path}",
          "separator": "/",
          "workspaceSuffix": "GitHub"
        }
      }
    ]
  }
}
이는 remotehub 스키마를 가진 모든 URI가 URI의 path 부분만 표시하고 구분 기호는 /가 된다는 것을 의미합니다. remotehub URI를 가진 워크스페이스는 레이블에 GitHub 접미사가 붙습니다.
contributes.semanticTokenModifiers
테마 규칙을 통해 강조 표시될 수 있는 새로운 시맨틱 토큰 수정자를 기여합니다.
{
  "contributes": {
    "semanticTokenModifiers": [
      {
        "id": "native",
        "description": "Annotates a symbol that is implemented natively"
      }
    ]
  }
}
시맨틱 하이라이팅에 대해 자세히 알아보려면 시맨틱 하이라이팅 가이드를 참조하세요.
contributes.semanticTokenScopes
시맨틱 토큰 유형 및 수정자와 범위 간의 매핑을 대체로 기여하거나 언어별 테마를 지원합니다.
{
  "contributes": {
    "semanticTokenScopes": [
      {
        "language": "typescript",
        "scopes": {
          "property.readonly": ["variable.other.constant.property.ts"]
        }
      }
    ]
  }
}
시맨틱 하이라이팅에 대해 자세히 알아보려면 시맨틱 하이라이팅 가이드를 참조하세요.
contributes.semanticTokenTypes
테마 규칙을 통해 강조 표시될 수 있는 새로운 시맨틱 토큰 유형을 기여합니다.
{
  "contributes": {
    "semanticTokenTypes": [
      {
        "id": "templateType",
        "superType": "type",
        "description": "A template type."
      }
    ]
  }
}
시맨틱 하이라이팅에 대해 자세히 알아보려면 시맨틱 하이라이팅 가이드를 참조하세요.
contributes.snippets
특정 언어에 대한 스니펫을 기여합니다. language 속성은 언어 식별자이고 path는 스니펫 파일에 대한 상대 경로이며, VS Code 스니펫 형식으로 스니펫을 정의합니다.
아래 예는 Go 언어에 대한 스니펫을 추가하는 방법을 보여줍니다.
{
  "contributes": {
    "snippets": [
      {
        "language": "go",
        "path": "./snippets/go.json"
      }
    ]
  }
}
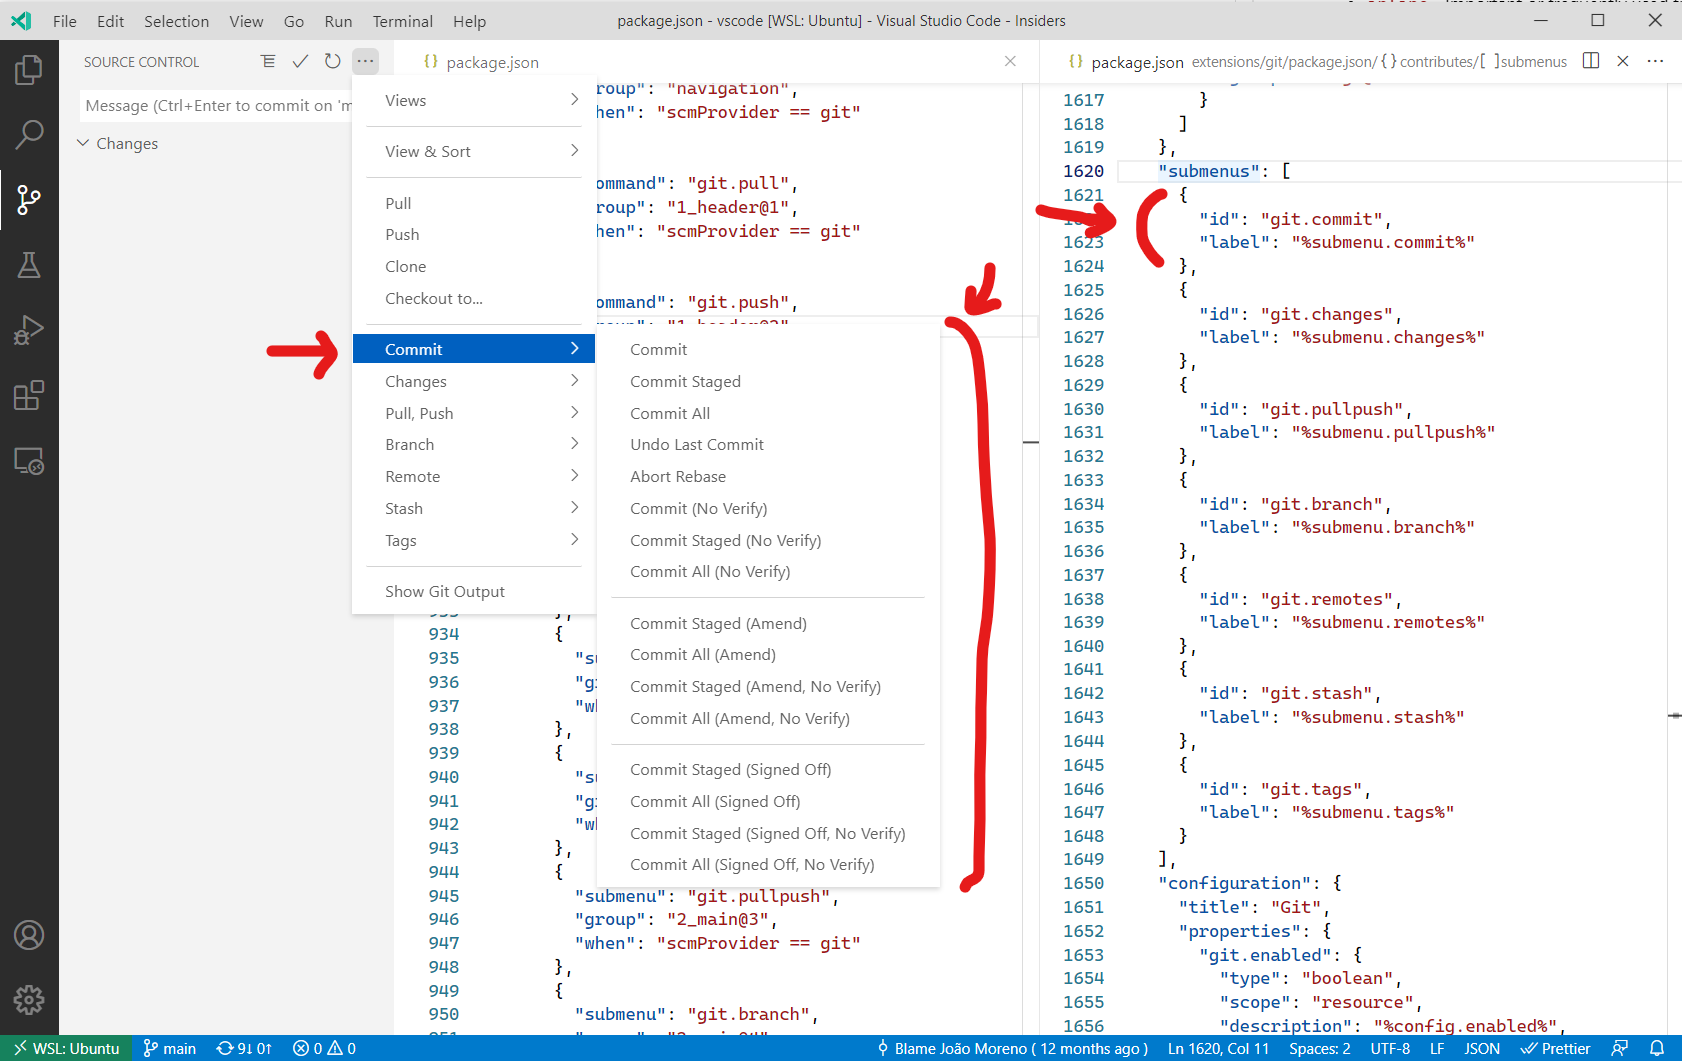
contributes.submenus
메뉴 항목을 기여할 수 있는 자리 표시자로 서브메뉴를 기여합니다. 서브메뉴는 부모 메뉴에 표시될 label이 필요합니다.
명령어는 제목 외에도 VS Code가 편집기 제목 메뉴에 표시할 아이콘을 정의할 수 있습니다.
서브메뉴 예제
{
  "contributes": {
    "submenus": [
      {
        "id": "git.commit",
        "label": "Commit"
      }
    ]
  }
}
contributes.taskDefinitions
시스템에서 기여된 작업을 고유하게 식별할 수 있도록 하는 객체 리터럴 구조를 기여하고 정의합니다. 작업 정의는 최소한 type 속성을 가지지만 일반적으로 추가 속성을 정의합니다. 예를 들어 package.json 파일의 스크립트를 나타내는 작업에 대한 작업 정의는 다음과 같습니다.
{
  "taskDefinitions": [
    {
      "type": "npm",
      "required": ["script"],
      "properties": {
        "script": {
          "type": "string",
          "description": "The script to execute"
        },
        "path": {
          "type": "string",
          "description": "The path to the package.json file. If omitted the package.json in the root of the workspace folder is used."
        }
      }
    }
  ]
}
작업 정의는 required 및 properties 속성에 대한 JSON 스키마 구문을 사용하여 정의됩니다. type 속성은 작업 유형을 정의합니다. 위의 예시의 경우
"type": "npm"은 작업 정의를 npm 작업과 연결합니다."required": [ "script" ]는script속성이 필수임을 정의합니다.path속성은 선택 사항입니다."properties" : { ... }는 추가 속성과 해당 유형을 정의합니다.
확장이 실제로 작업을 만들 때 package.json 파일에 기여된 작업 정의와 일치하는 TaskDefinition을 전달해야 합니다. npm 예의 경우 package.json 파일 내의 테스트 스크립트에 대한 작업 생성은 다음과 같습니다.
let task = new vscode.Task({ type: 'npm', script: 'test' }, ....);
contributes.terminal
VS Code에 터미널 프로필을 기여하여 확장이 프로필 생성을 처리할 수 있도록 합니다. 정의되면 프로필은 터미널 프로필 생성 시 나타나야 합니다.
{
  "activationEvents": ["onTerminalProfile:my-ext.terminal-profile"],
  "contributes": {
    "terminal": {
      "profiles": [
        {
          "title": "Profile from extension",
          "id": "my-ext.terminal-profile"
        }
      ]
    }
  }
}
정의되면 프로필은 터미널 프로필 선택기에 표시됩니다. 활성화되면 터미널 옵션을 반환하여 프로필 생성을 처리합니다.
vscode.window.registerTerminalProfileProvider('my-ext.terminal-profile', {
  provideTerminalProfile(
    token: vscode.CancellationToken
  ): vscode.ProviderResult<vscode.TerminalOptions | vscode.ExtensionTerminalOptions> {
    return { name: 'Profile from extension', shellPath: 'bash' };
  }
});
contributes.themes
VS Code에 색상 테마를 기여하여 워크벤치 색상과 편집기의 구문 토큰 스타일을 정의합니다.
레이블, 테마가 어두운 테마인지 밝은 테마인지(나머지 VS Code가 테마에 맞게 변경되도록) 및 파일 경로(JSON 형식)를 지정해야 합니다.
테마 예제
{
  "contributes": {
    "themes": [
      {
        "label": "Monokai",
        "uiTheme": "vs-dark",
        "path": "./themes/monokai-color-theme.json"
      }
    ]
  }
}
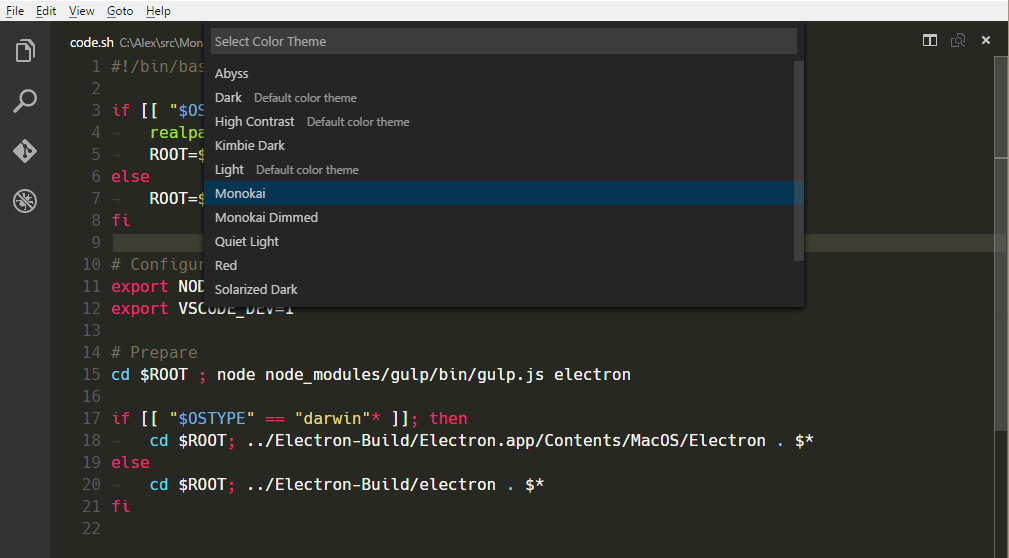
색상 테마를 만드는 방법에 대한 색상 테마 가이드를 참조하세요.
contributes.typescriptServerPlugins
VS Code의 JavaScript 및 TypeScript 지원을 강화하는 TypeScript 서버 플러그인을 기여합니다.
{
  "contributes": {
    "typescriptServerPlugins": [
      {
        "name": "typescript-styled-plugin"
      }
    ]
  }
}
위의 예제 확장은 typescript-styled-plugin을 기여하며, 이는 JavaScript 및 TypeScript에 대한 styled-component IntelliSense를 추가합니다. 이 플러그인은 확장 프로그램에서 로드되며 확장 프로그램의 일반 NPM dependency로 설치되어야 합니다.
{
  "dependencies": {
    "typescript-styled-plugin": "*"
  }
}
TypeScript 서버 플러그인은 사용자가 VS Code의 TypeScript 버전을 사용하는 경우 모든 JavaScript 및 TypeScript 파일에 대해 로드됩니다. 플러그인이 명시적으로 "enableForWorkspaceTypeScriptVersions": true를 설정하지 않는 한 사용자가 워크스페이스 버전을 사용하는 TypeScript를 사용하는 경우 활성화되지 않습니다.
{
  "contributes": {
    "typescriptServerPlugins": [
      {
        "name": "typescript-styled-plugin",
        "enableForWorkspaceTypeScriptVersions": true
      }
    ]
  }
}
플러그인 구성
확장은 VS Code의 기본 제공 TypeScript 확장에서 제공하는 API를 통해 기여된 TypeScript 플러그인에 구성 데이터를 보낼 수 있습니다.
// In your VS Code extension

export async function activate(context: vscode.ExtensionContext) {
  // Get the TS extension
  const tsExtension = vscode.extensions.getExtension('vscode.typescript-language-features');
  if (!tsExtension) {
    return;
  }

  await tsExtension.activate();

  // Get the API from the TS extension
  if (!tsExtension.exports || !tsExtension.exports.getAPI) {
    return;
  }

  const api = tsExtension.exports.getAPI(0);
  if (!api) {
    return;
  }

  // Configure the 'my-typescript-plugin-id' plugin
  api.configurePlugin('my-typescript-plugin-id', {
    someValue: process.env['SOME_VALUE']
  });
}
TypeScript 서버 플러그인은 onConfigurationChanged 메서드를 통해 구성 데이터를 수신합니다.
// In your TypeScript plugin

import * as ts_module from 'typescript/lib/tsserverlibrary';

export = function init({ typescript }: { typescript: typeof ts_module }) {
  return {
    create(info: ts.server.PluginCreateInfo) {
      // Create new language service
    },
    onConfigurationChanged(config: any) {
      // Receive configuration changes sent from VS Code
    }
  };
};
이 API를 통해 VS Code 확장은 VS Code 설정을 TypeScript 서버 플러그인과 동기화하거나 플러그인의 동작을 동적으로 변경할 수 있습니다. 실제 사용 사례를 보려면 TypeScript TSLint 플러그인 및 lit-html 확장을 참조하세요.
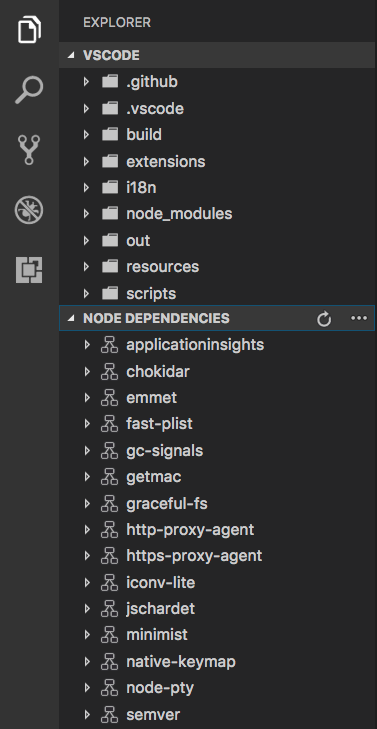
contributes.views
VS Code에 보기를 기여합니다. 보기에 대한 식별자와 이름을 지정해야 합니다. 다음 보기 컨테이너에 기여할 수 있습니다.
explorer: 활동 표시줄의 탐색기 보기 컨테이너scm: 활동 표시줄의 소스 제어 관리(SCM) 보기 컨테이너debug: 활동 표시줄의 실행 및 디버그 보기 컨테이너test: 활동 표시줄의 테스트 보기 컨테이너- 확장에서 기여한 사용자 지정 보기 컨테이너.
사용자가 보기를 열면 VS Code는 onView:${viewId}(아래 예제의 경우 onView:nodeDependencies) 활성화 이벤트를 내보냅니다. when 컨텍스트 값을 제공하여 보기의 가시성을 제어할 수도 있습니다. 지정된 icon은 제목을 표시할 수 없을 때(예: 보기가 활동 표시줄로 드래그될 때) 사용됩니다. contextualTitle은 보기가 기본 보기 컨테이너 외부로 이동되어 추가 컨텍스트가 필요할 때 사용됩니다.
{
  "contributes": {
    "views": {
      "explorer": [
        {
          "id": "nodeDependencies",
          "name": "Node Dependencies",
          "when": "workspaceHasPackageJSON",
          "icon": "media/dep.svg",
          "contextualTitle": "Package Explorer"
        }
      ]
    }
  }
}
보기의 내용은 두 가지 방법으로 채워질 수 있습니다.
- TreeView를 사용하여
createTreeViewAPI를 통해 데이터 공급자를 제공하거나 데이터 공급자를registerTreeDataProviderAPI를 통해 직접 등록하여 데이터를 채웁니다. TreeView는 계층적 데이터 및 목록을 표시하는 데 이상적입니다. tree-view-sample을 참조하세요. - WebviewView를 사용하여
registerWebviewViewProvider로 공급자를 등록합니다. Webview 보기를 사용하면 보기에서 임의의 HTML을 렌더링할 수 있습니다. 자세한 내용은 webview view sample extension을 참조하세요.
contributes.viewsContainers
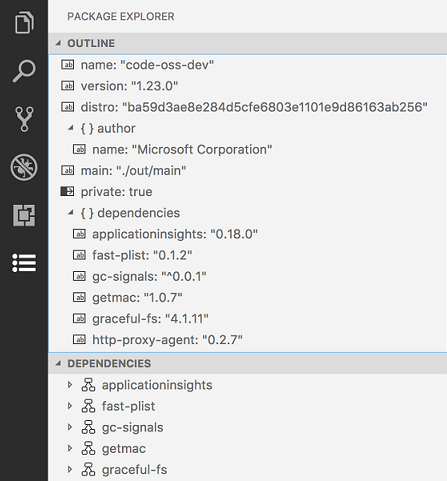
contributes.views에 사용자 지정 보기를 기여할 수 있는 보기 컨테이너를 기여합니다. 보기 컨테이너에 대한 식별자, 제목 및 아이콘을 지정해야 합니다. 현재 활동 표시줄(activitybar) 및 패널(panel)에 기여할 수 있습니다. 아래 예는 Package Explorer 보기 컨테이너가 활동 표시줄에 기여되는 방법과 보기가 해당 컨테이너에 기여되는 방법을 보여줍니다.
{
  "contributes": {
    "viewsContainers": {
      "activitybar": [
        {
          "id": "package-explorer",
          "title": "Package Explorer",
          "icon": "resources/package-explorer.svg"
        }
      ]
    },
    "views": {
      "package-explorer": [
        {
          "id": "package-dependencies",
          "name": "Dependencies"
        },
        {
          "id": "package-outline",
          "name": "Outline"
        }
      ]
    }
  }
}
아이콘 사양
-
크기:아이콘은 24x24이고 중앙에 맞춰져야 합니다. -
Color:Icons should use a single color. -
Format:It is recommended that icons be in SVG, though any image file type is accepted. -
상태:모든 아이콘은 다음과 같은 상태 스타일을 상속합니다.상태 불투명도 기본값 60% 호버 100% 활성 100%
contributes.viewsWelcome
사용자 지정 보기에 환영 콘텐츠를 기여합니다. 환영 콘텐츠는 빈 트리 보기에만 적용됩니다. 트리에 자식이 없고 TreeView.message가 없는 경우 보기는 빈 것으로 간주됩니다. 관례적으로 자체 줄에 있는 모든 명령 링크는 버튼으로 표시됩니다. view 속성을 사용하여 환영 콘텐츠를 적용할 보기를 지정할 수 있습니다. 환영 콘텐츠의 가시성은 when 컨텍스트 값을 사용하여 제어할 수 있습니다. 환영 콘텐츠로 표시될 텍스트는 contents 속성으로 설정됩니다.
{
  "contributes": {
    "viewsWelcome": [
      {
        "view": "scm",
        "contents": "In order to use git features, you can open a folder containing a git repository or clone from a URL.\n[Open Folder](command:vscode.openFolder)\n[Clone Repository](command:git.clone)\nTo learn more about how to use git and source control in VS Code [read our docs](https://aka.ms/vscode-scm).",
        "when": "config.git.enabled && git.state == initialized && workbenchState == empty"
      }
    ]
  }
}
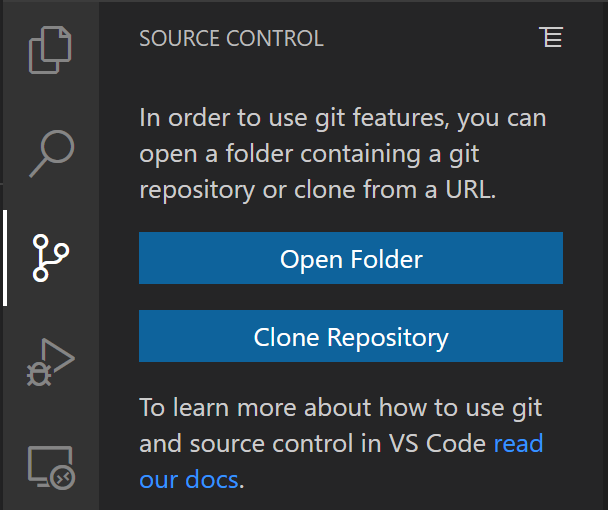
하나의 보기에 여러 개의 환영 콘텐츠 항목을 기여할 수 있습니다. 이 경우 VS Code 코어에서 온 콘텐츠가 먼저 오고, 기본 확장 프로그램에서 온 콘텐츠가 오고, 나머지 모든 확장 프로그램에서 온 콘텐츠가 옵니다.
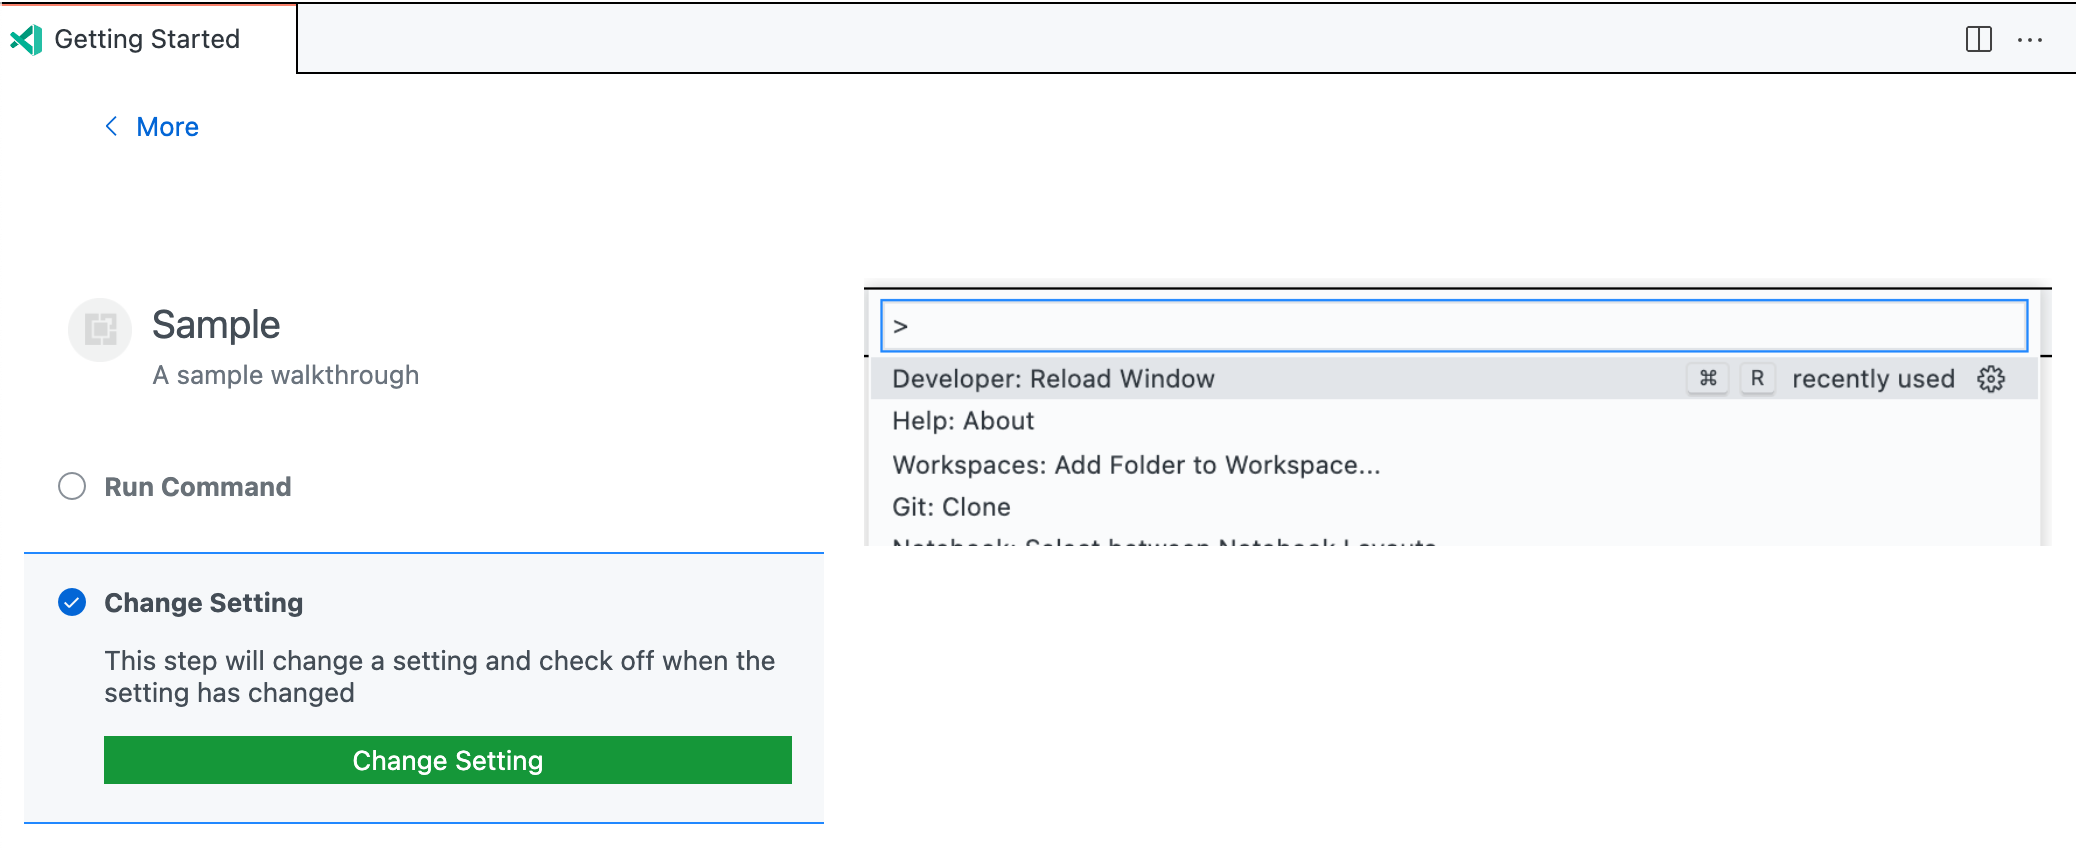
contributes.walkthroughs
시작 페이지에 표시될 워크스루를 기여합니다. 워크스루는 확장 프로그램 설치 시 자동으로 열리며 사용자가 확장 프로그램의 기능을 소개하는 편리한 방법을 제공합니다.
워크스루는 제목, 설명, ID 및 일련의 단계로 구성됩니다. 또한 when 조건을 설정하여 컨텍스트 키를 기반으로 워크스루를 숨기거나 표시할 수 있습니다. 예를 들어 Linux 플랫폼에서 설정을 설명하는 워크스루에는 Linux 시스템에서만 나타나도록 when: "isLinux"를 지정할 수 있습니다.
워크스루의 각 단계에는 제목, 설명, ID 및 미디어 요소(이미지 또는 Markdown 콘텐츠)가 있으며, 해당 단계를 확인(아래 예에서 표시)하는 트리거가 될 수 있는 선택적 이벤트 세트가 있습니다. 단계 설명은 Markdown 콘텐츠이며 **굵게**, __밑줄__, ``코드`` 렌더링 및 링크를 지원합니다. 워크스루와 마찬가지로 단계에는 컨텍스트 키를 기반으로 숨기거나 표시하는 when 조건을 지정할 수 있습니다.
SVG는 크기 조정 기능과 VS Code 테마 색상 지원으로 인해 이미지에 권장됩니다. Visual Studio Code Color Mapper Figma 플러그인을 사용하여 SVG에서 테마 색상을 쉽게 참조하세요.
{
  "contributes": {
    "walkthroughs": [
      {
        "id": "sample",
        "title": "Sample",
        "description": "A sample walkthrough",
        "steps": [
          {
            "id": "runcommand",
            "title": "Run Command",
            "description": "This step will run a command and check off once it has been run.\n[Run Command](command:getting-started-sample.runCommand)",
            "media": { "image": "media/image.png", "altText": "Empty image" },
            "completionEvents": ["onCommand:getting-started-sample.runCommand"]
          },
          {
            "id": "changesetting",
            "title": "Change Setting",
            "description": "This step will change a setting and check off when the setting has changed\n[Change Setting](command:getting-started-sample.changeSetting)",
            "media": { "markdown": "media/markdown.md" },
            "completionEvents": ["onSettingChanged:getting-started-sample.sampleSetting"]
          }
        ]
      }
    ]
  }
}
완료 이벤트
기본적으로 completionEvents 이벤트가 제공되지 않으면 단계의 버튼 중 하나가 클릭되면 해당 단계가 확인됩니다. 단계에 버튼이 없으면 열릴 때 확인됩니다. 더 세밀한 제어가 필요한 경우 completionEvents 목록을 제공할 수 있습니다.
사용 가능한 완료 이벤트는 다음과 같습니다.
onCommand:myCommand.id: 명령이 실행되면 단계 확인.onSettingChanged:mySetting.id: 지정된 설정이 수정되면 단계 확인.onContext:contextKeyExpression: 컨텍스트 키 표현식이 true로 평가되면 단계 확인.extensionInstalled:myExt.id: 지정된 확장이 설치된 경우 단계 확인.onView:myView.id: 지정된 보기가 표시되면 단계 확인.onLink:https://...: 지정된 링크가 워크스루를 통해 열리면 단계 확인.
단계가 확인되면 사용자가 명시적으로 단계를 해제하거나 진행 상황을 재설정(시작: 진행 상황 재설정 명령을 통해)할 때까지 확인된 상태로 유지됩니다.