Notebook API
Notebook API를 사용하면 Visual Studio Code 확장에서 파일을 노트북으로 열고, 노트북 코드 셀을 실행하고, 다양한 풍부하고 대화형 형식으로 노트북 출력을 렌더링할 수 있습니다. Jupyter Notebook 또는 Google Colab과 같은 인기 있는 노트북 인터페이스를 알고 계실 것입니다. Notebook API를 사용하면 Visual Studio Code 내에서 유사한 환경을 경험할 수 있습니다.
노트북의 구성 요소
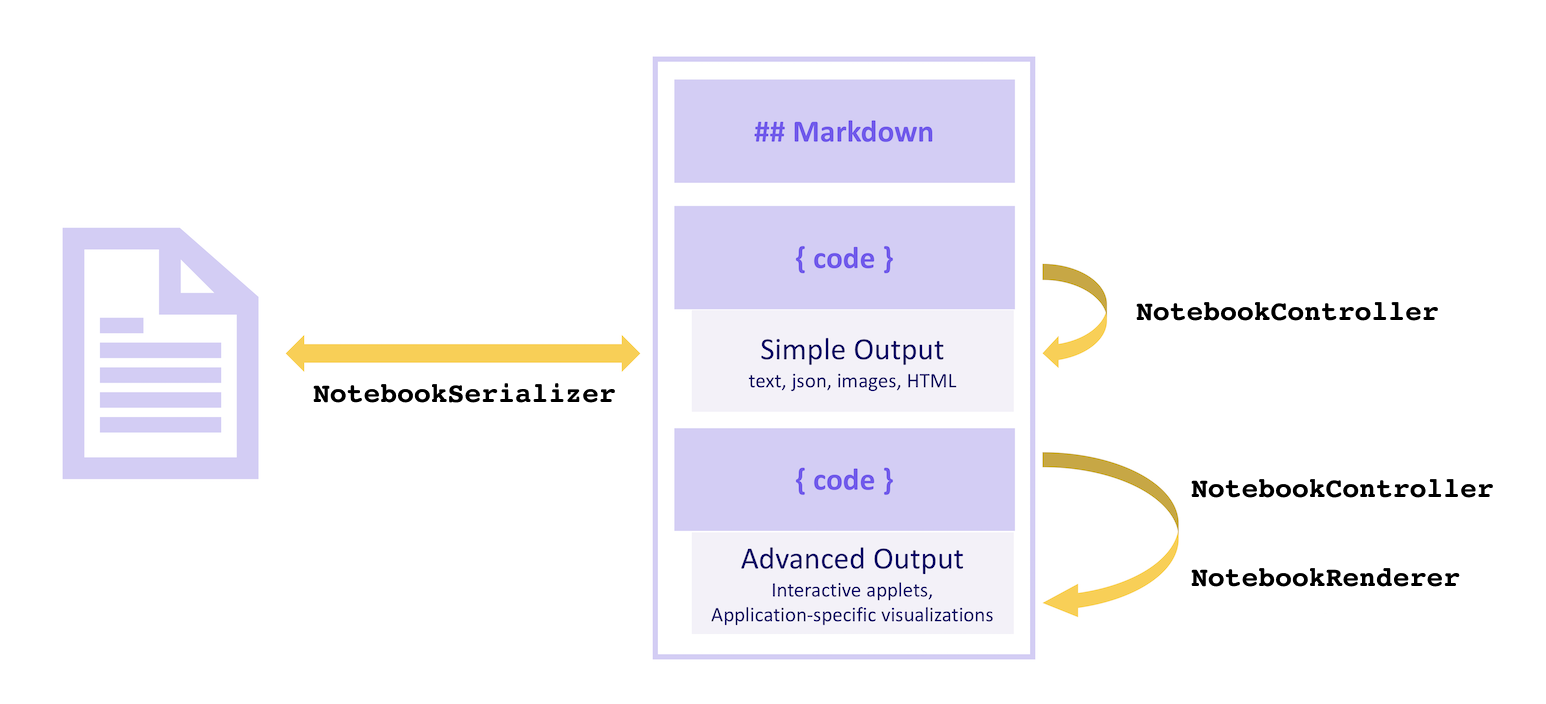
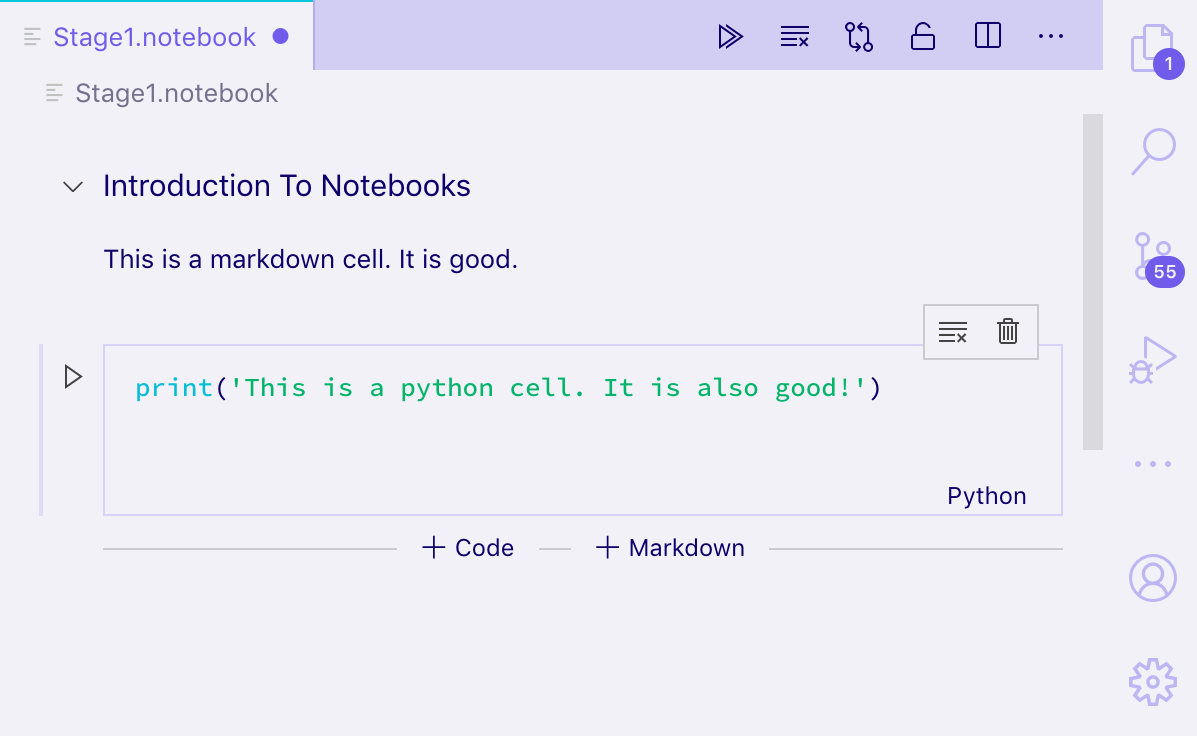
노트북은 셀과 해당 출력의 시퀀스로 구성됩니다. 노트북의 셀은 Markdown 셀 또는 코드 셀이 될 수 있으며 VS Code의 핵심 내에서 렌더링됩니다. 출력은 다양한 형식이 될 수 있습니다. 일반 텍스트, JSON, 이미지 및 HTML과 같은 일부 출력 형식은 VS Code 코어에서 렌더링됩니다. 애플리케이션별 데이터 또는 대화형 애플릿과 같은 다른 형식은 확장에서 렌더링됩니다.
노트북의 셀은 NotebookSerializer에 의해 파일 시스템에서 읽고 쓰여집니다. 이 NotebookSerializer는 파일 시스템에서 데이터를 읽어 셀에 대한 설명으로 변환하고, 노트북의 수정 사항을 다시 파일 시스템에 유지하는 작업을 처리합니다. 노트북의 코드 셀은 NotebookController에 의해 실행될 수 있습니다. 이 NotebookController는 셀의 내용을 받아 텍스트부터 형식화된 문서 또는 대화형 애플릿에 이르기까지 다양한 형식으로 하나 이상의 출력을 생성합니다. 애플리케이션별 출력 형식과 대화형 애플릿 출력은 NotebookRenderer에 의해 렌더링됩니다.
시각적으로
Serializer
NotebookSerializer는 노트북의 직렬화된 바이트를 받아 이 바이트를 Markdown 및 코드 셀 목록을 포함하는 NotebookData로 역직렬화하는 역할을 합니다. 또한 반대 변환도 담당합니다. 즉, NotebookData를 받아 데이터를 저장할 직렬화된 바이트로 변환합니다.
샘플
- JSON Notebook Serializer: JSON 입력을 받아 사용자 지정
NotebookRenderer에서 보기 좋게 포맷된 JSON을 출력하는 간단한 예제 노트북입니다. - Markdown Serializer: Markdown 파일을 노트북으로 열고 편집합니다.
예
이 예제에서는 .notebook 확장자를 사용하는 (전통적인 파일 확장자인 .ipynb 대신) Jupyter Notebook 형식의 파일을 보기 위한 단순화된 노트북 제공자 확장을 만듭니다.
노트북 시리얼라이저는 다음과 같이 확장 프로그램의 package.json에 있는 contributes.notebooks 섹션에 선언됩니다.
{
    ...
    "contributes": {
        ...
        "notebooks": [
            {
                "type": "my-notebook",
                "displayName": "My Notebook",
                "selector": [
                    {
                        "filenamePattern": "*.notebook"
                    }
                ]
            }
        ]
    }
}
그런 다음 확장 프로그램의 활성화 이벤트에서 노트북 시리얼라이저를 등록합니다.
import { TextDecoder, TextEncoder } from 'util';
import * as vscode from 'vscode';

export function activate(context: vscode.ExtensionContext) {
  context.subscriptions.push(
    vscode.workspace.registerNotebookSerializer('my-notebook', new SampleSerializer())
  );
}

interface RawNotebook {
  cells: RawNotebookCell[];
}

interface RawNotebookCell {
  source: string[];
  cell_type: 'code' | 'markdown';
}

class SampleSerializer implements vscode.NotebookSerializer {
  async deserializeNotebook(
    content: Uint8Array,
    _token: vscode.CancellationToken
  ): Promise<vscode.NotebookData> {
    var contents = new TextDecoder().decode(content);

    let raw: RawNotebookCell[];
    try {
      raw = (<RawNotebook>JSON.parse(contents)).cells;
    } catch {
      raw = [];
    }

    const cells = raw.map(
      item =>
        new vscode.NotebookCellData(
          item.cell_type === 'code'
            ? vscode.NotebookCellKind.Code
            : vscode.NotebookCellKind.Markup,
          item.source.join('\n'),
          item.cell_type === 'code' ? 'python' : 'markdown'
        )
    );

    return new vscode.NotebookData(cells);
  }

  async serializeNotebook(
    data: vscode.NotebookData,
    _token: vscode.CancellationToken
  ): Promise<Uint8Array> {
    let contents: RawNotebookCell[] = [];

    for (const cell of data.cells) {
      contents.push({
        cell_type: cell.kind === vscode.NotebookCellKind.Code ? 'code' : 'markdown',
        source: cell.value.split(/\r?\n/g)
      });
    }

    return new TextEncoder().encode(JSON.stringify(contents));
  }
}
이제 확장 프로그램을 실행하고 .notebook 확장자로 저장된 Jupyter Notebook 형식 파일을 열어보십시오.
Jupyter 형식의 노트북을 열고 셀을 일반 텍스트 및 렌더링된 Markdown으로 볼 수 있으며 셀을 편집할 수도 있습니다. 그러나 출력은 디스크에 유지되지 않습니다. 출력을 저장하려면 NotebookData에서 셀의 출력을 직렬화 및 역직렬화해야 합니다.
셀을 실행하려면 NotebookController를 구현해야 합니다.
Controller
NotebookController는 코드 셀을 받아 코드를 실행하여 하나 이상의 출력을 생성하는 역할을 합니다.
컨트롤러는 컨트롤러 생성 시 NotebookController#notebookType 속성을 설정하여 노트북 시리얼라이저 및 노트북 유형과 직접 연결됩니다. 그런 다음 컨트롤러는 확장 프로그램 활성화 시 컨트롤러를 확장 프로그램 구독에 푸시하여 전역적으로 등록됩니다.
export function activate(context: vscode.ExtensionContext) {
  context.subscriptions.push(new Controller());
}

class Controller {
  readonly controllerId = 'my-notebook-controller-id';
  readonly notebookType = 'my-notebook';
  readonly label = 'My Notebook';
  readonly supportedLanguages = ['python'];

  private readonly _controller: vscode.NotebookController;
  private _executionOrder = 0;

  constructor() {
    this._controller = vscode.notebooks.createNotebookController(
      this.controllerId,
      this.notebookType,
      this.label
    );

    this._controller.supportedLanguages = this.supportedLanguages;
    this._controller.supportsExecutionOrder = true;
    this._controller.executeHandler = this._execute.bind(this);
  }

  private _execute(
    cells: vscode.NotebookCell[],
    _notebook: vscode.NotebookDocument,
    _controller: vscode.NotebookController
  ): void {
    for (let cell of cells) {
      this._doExecution(cell);
    }
  }

  private async _doExecution(cell: vscode.NotebookCell): Promise<void> {
    const execution = this._controller.createNotebookCellExecution(cell);
    execution.executionOrder = ++this._executionOrder;
    execution.start(Date.now()); // Keep track of elapsed time to execute cell.

    /* Do some execution here; not implemented */

    execution.replaceOutput([
      new vscode.NotebookCellOutput([
        vscode.NotebookCellOutputItem.text('Dummy output text!')
      ])
    ]);
    execution.end(true, Date.now());
  }
}
시리얼라이저와 별도로 NotebookController를 제공하는 확장을 게시하는 경우, package.json의 keywords에 notebookKernel<ViewTypeUpperCamelCased>와 같은 항목을 추가하십시오. 예를 들어 github-issues 노트북 유형에 대한 대체 커널을 게시하는 경우 확장 프로그램에 notebookKernelGithubIssues 키워드를 추가해야 합니다. 이렇게 하면 Visual Studio Code에서 <ViewTypeUpperCamelCased> 유형의 노트북을 열 때 확장 프로그램의 검색 가능성이 향상됩니다.
샘플
- GitHub Issues Notebook: GitHub Issues 쿼리를 실행하는 컨트롤러
- REST Book: REST 쿼리를 실행하는 컨트롤러.
- Regexper notebooks: 정규 표현식을 시각화하는 컨트롤러.
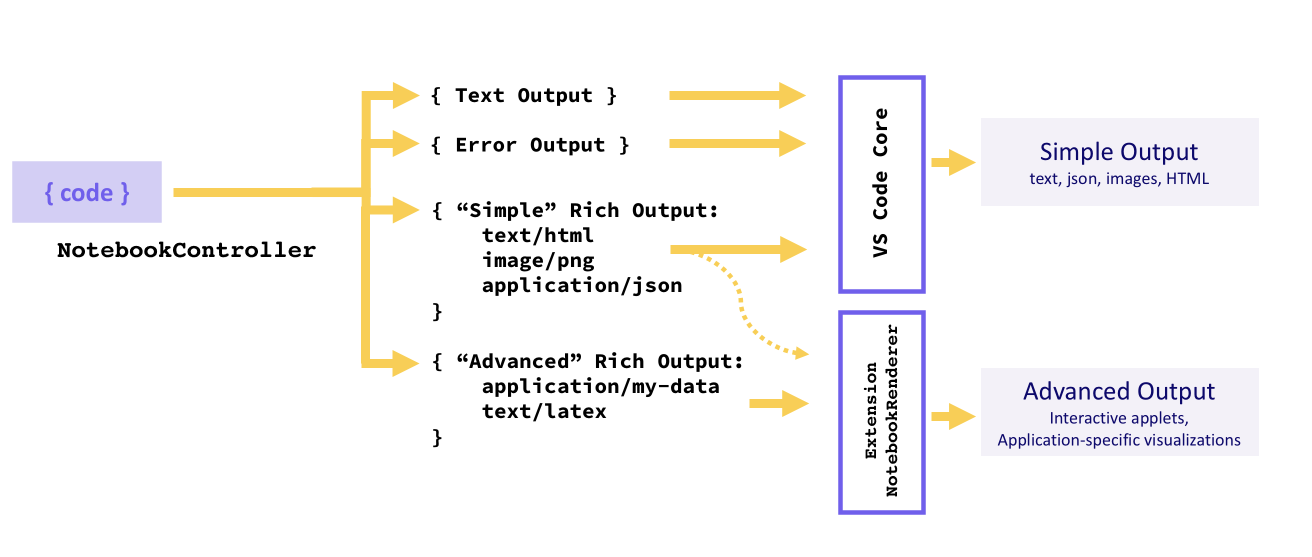
출력 유형
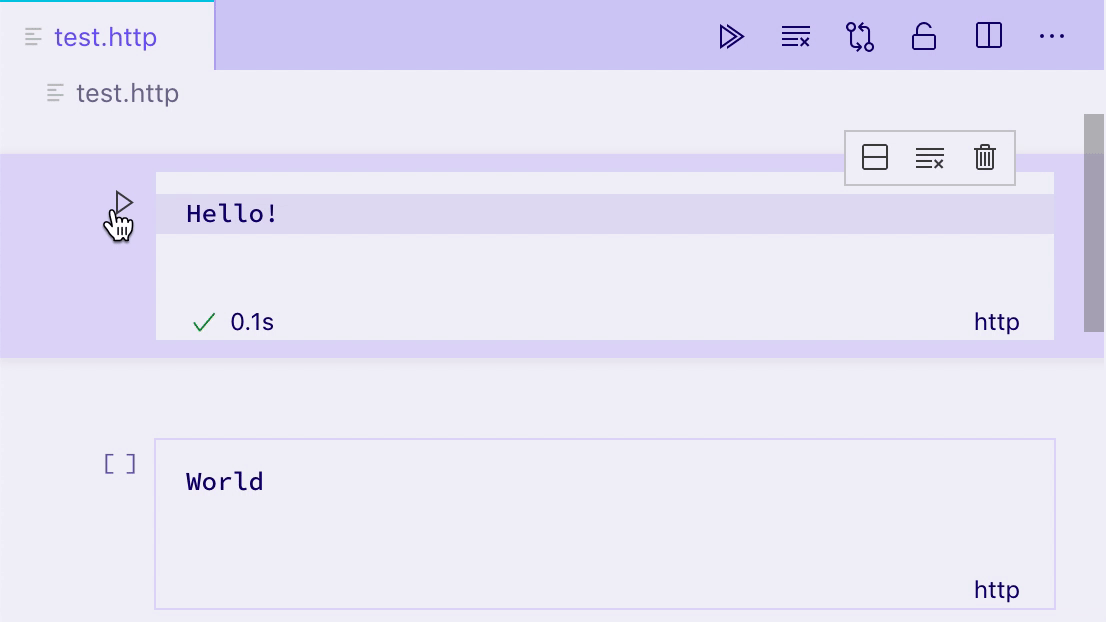
출력은 텍스트 출력, 오류 출력 또는 풍부한 출력의 세 가지 형식 중 하나여야 합니다. 커널은 단일 셀 실행에 대해 여러 출력을 제공할 수 있으며, 이 경우 목록으로 표시됩니다.
텍스트 출력, 오류 출력 또는 풍부한 출력의 "단순" 변형(HTML, Markdown, JSON 등)과 같은 간단한 형식은 VS Code 코어에서 렌더링되는 반면, 애플리케이션별 풍부한 출력 유형은 NotebookRenderer에서 렌더링됩니다. 확장은 선택적으로 "단순" 풍부한 출력을 자체적으로 렌더링할 수 있습니다. 예를 들어 Markdown 출력에 LaTeX 지원을 추가할 수 있습니다.
텍스트 출력
텍스트 출력은 가장 간단한 출력 형식이며 익숙한 많은 REPL과 유사하게 작동합니다. text 필드만 포함하며, 이 필드는 셀의 출력 요소에 일반 텍스트로 렌더링됩니다.
vscode.NotebookCellOutputItem.text('This is the output...');
오류 출력
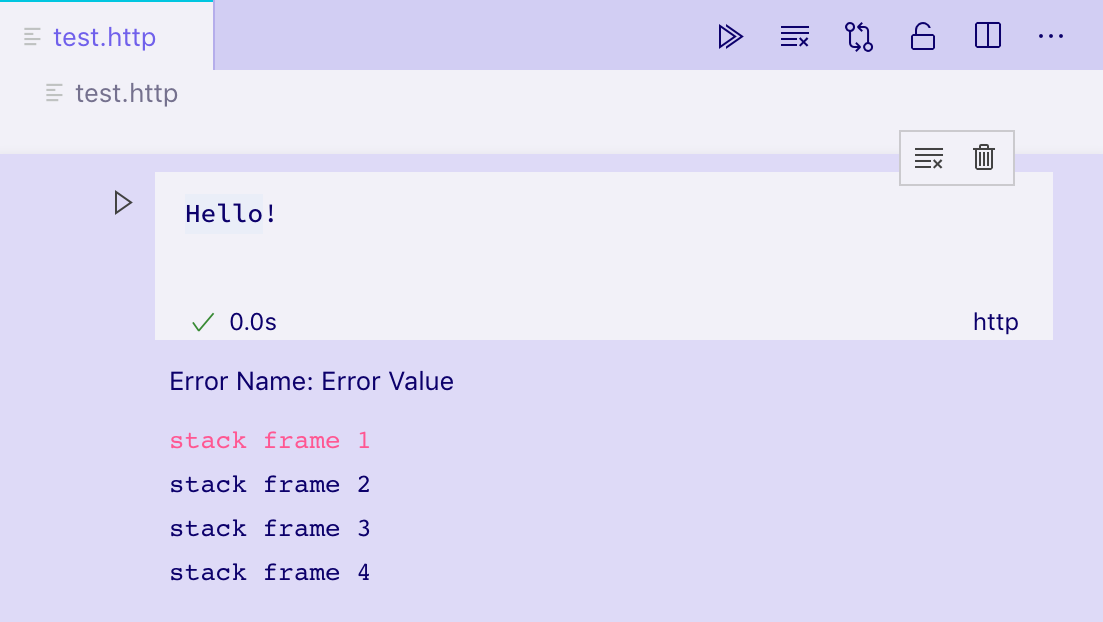
오류 출력은 런타임 오류를 일관되고 이해하기 쉬운 방식으로 표시하는 데 유용합니다. 표준 Error 객체를 지원합니다.
try {
  /* Some code */
} catch (error) {
  vscode.NotebookCellOutputItem.error(error);
}
풍부한 출력
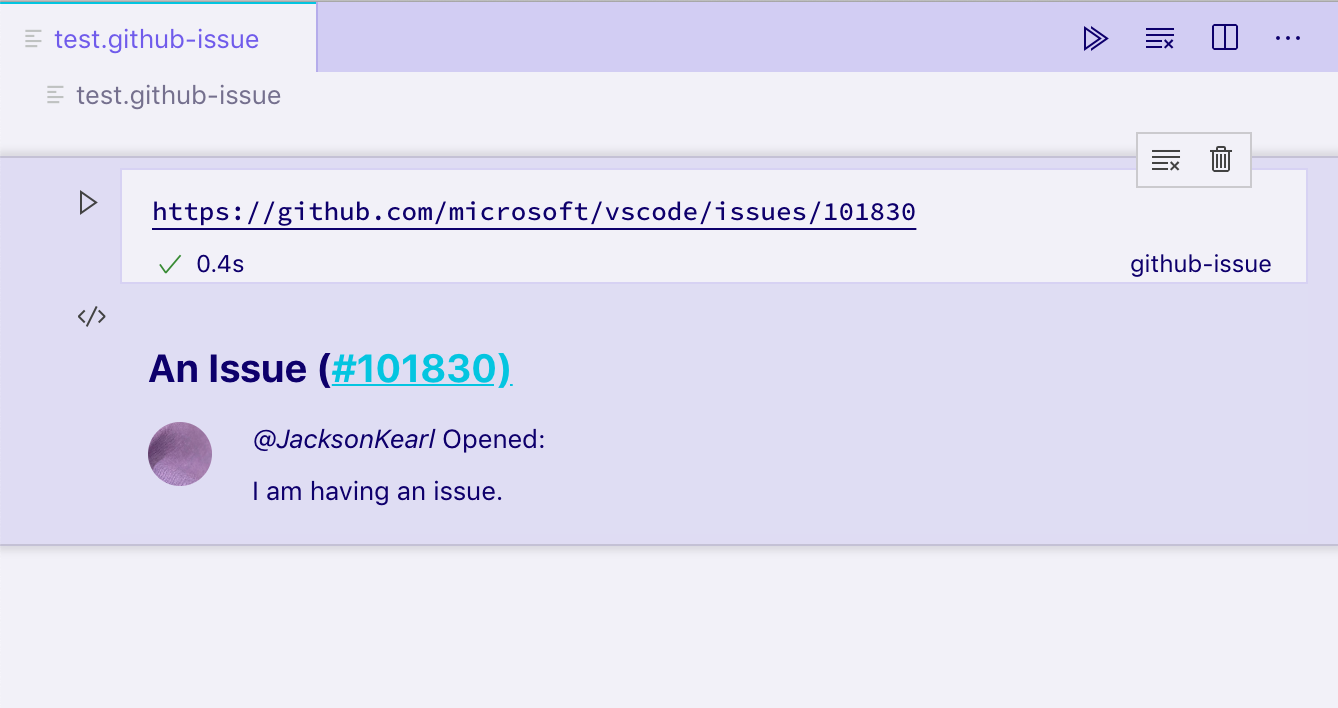
풍부한 출력은 셀 출력 표시의 가장 고급 형태입니다. 이를 통해 mimetypes로 키 지정된 출력 데이터에 대한 다양한 표현을 제공할 수 있습니다. 예를 들어 셀 출력이 GitHub Issue를 나타내는 경우 커널은 data 필드에 여러 속성을 가진 풍부한 출력을 생성할 수 있습니다.
- 이슈의 형식화된 보기를 포함하는
text/html필드. - 기계가 읽을 수 있는 보기를 포함하는
text/x-json필드. NotebookRenderer가 완전히 대화형 보기를 만드는 데 사용할 수 있는application/github-issue필드.
이 경우 text/html 및 text/x-json 보기는 VS Code에서 기본적으로 렌더링되지만, 해당 mimetype에 대해 NotebookRenderer가 등록되지 않은 경우 application/github-issue 보기에 오류가 표시됩니다.
execution.replaceOutput([new vscode.NotebookCellOutput([
                            vscode.NotebookCellOutputItem.text('<b>Hello</b> World', 'text/html'),
                            vscode.NotebookCellOutputItem.json({ hello: 'world' }),
                            vscode.NotebookCellOutputItem.json({ custom-data-for-custom-renderer: 'data' }, 'application/custom'),
                        ])]);
기본적으로 VS Code는 다음 mimetypes를 렌더링할 수 있습니다.
- application/javascript
- text/html
- image/svg+xml
- text/markdown
- image/png
- image/jpeg
- text/plain
VS Code는 이러한 mimetypes를 빌트인 편집기에서 코드 형식으로 렌더링합니다.
- text/x-json
- text/x-javascript
- text/x-html
- text/x-rust
- ... 다른 내장 또는 설치된 언어에 대한
text/x-LANGUAGE_ID.
이 노트북은 빌트인 편집기를 사용하여 Rust 코드를 표시합니다. 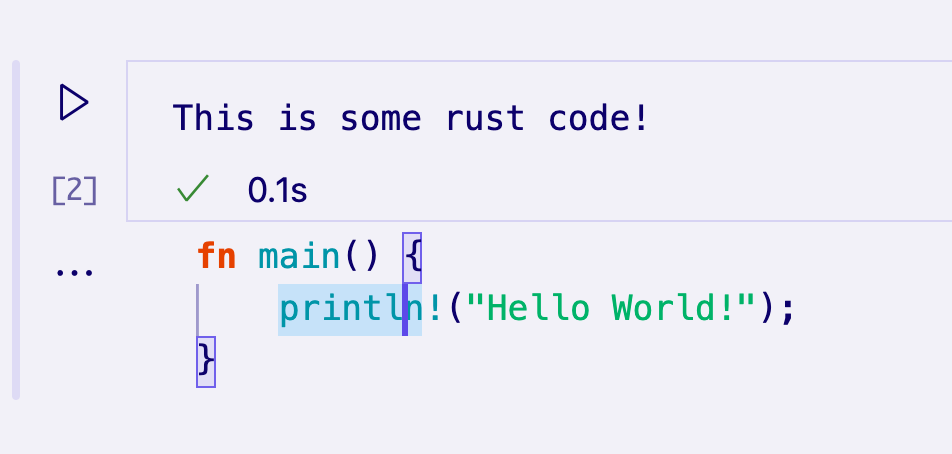
대체 mimetype를 렌더링하려면 해당 mimetype에 대해 NotebookRenderer를 등록해야 합니다.
Notebook Renderer
노트북 렌더러는 특정 mimetype의 출력 데이터를 받아 해당 데이터의 렌더링된 보기를 제공하는 역할을 합니다. 출력 셀에서 공유되는 렌더러는 이러한 셀 간에 전역 상태를 유지할 수 있습니다. 렌더링된 보기의 복잡성은 간단한 정적 HTML부터 동적인 완전 대화형 애플릿까지 다양할 수 있습니다. 이 섹션에서는 GitHub Issue를 나타내는 출력을 렌더링하기 위한 다양한 기술을 살펴보겠습니다.
Yeoman 생성기에서 제공하는 보일러플레이트를 사용하여 빠르게 시작할 수 있습니다. 이를 위해 먼저 Yeoman과 VS Code 생성기를 설치하십시오.
npm install -g yo generator-code
그런 다음 yo code를 실행하고 New Notebook Renderer (TypeScript)를 선택하십시오.
이 템플릿을 사용하지 않는 경우, 확장 프로그램의 package.json에 notebookRenderer를 keywords에 추가하고, 사용자가 렌더러를 찾을 수 있도록 확장 프로그램 이름 또는 설명에 mimetype을 언급해야 합니다.
간단하고 대화형이 아닌 렌더러
렌더러는 확장 프로그램의 package.json에 있는 contributes.notebookRenderer 속성에 기여하여 특정 mimetypes 집합에 대해 선언됩니다. 이 렌더러는 ms-vscode.github-issue-notebook/github-issue 형식의 입력을 처리하며, 일부 설치된 컨트롤러가 이를 제공할 수 있다고 가정합니다.
{
  "activationEvents": ["...."],
  "contributes": {
    ...
    "notebookRenderer": [
      {
        "id": "github-issue-renderer",
        "displayName": "GitHub Issue Renderer",
        "entrypoint": "./out/renderer.js",
        "mimeTypes": [
          "ms-vscode.github-issue-notebook/github-issue"
        ]
      }
    ]
  }
}
출력 렌더러는 자체적으로 VS Code UI의 나머지 부분과 분리된 단일 iframe에서 렌더링되어 실수로 VS Code를 방해하거나 속도를 늦추지 않도록 합니다. 이 기여는 노트북의 iframe에 로드되는 "진입점" 스크립트를 참조하며, 이 스크립트는 렌더링할 출력이 필요하기 직전에 로드됩니다. 진입점은 단일 파일이어야 하며, 직접 작성하거나 Webpack, Rollup 또는 Parcel과 같은 번들러를 사용하여 생성할 수 있습니다.
로드되면 진입점 스크립트는 vscode-notebook-renderer에서 ActivationFunction을 내보내 VS Code가 렌더러를 렌더링할 준비가 되면 UI를 렌더링해야 합니다. 예를 들어, 이 코드는 모든 GitHub 이슈 데이터를 셀 출력에 JSON 형식으로 넣습니다.
import type { ActivationFunction } from 'vscode-notebook-renderer';

export const activate: ActivationFunction = context => ({
  renderOutputItem(data, element) {
    element.innerText = JSON.stringify(data.json());
  }
});
전체 API 정의는 여기에서 참조할 수 있습니다. TypeScript를 사용하는 경우 @types/vscode-notebook-renderer를 설치한 다음 tsconfig.json의 types 배열에 vscode-notebook-renderer를 추가하여 코드에서 이러한 유형을 사용할 수 있도록 할 수 있습니다.
더 풍부한 콘텐츠를 만들기 위해 DOM 요소를 수동으로 생성하거나 Preact와 같은 프레임워크를 사용하여 출력 요소에 렌더링할 수 있습니다. 예를 들어
import type { ActivationFunction } from 'vscode-notebook-renderer';
import { h, render } from 'preact';

const Issue: FunctionComponent<{ issue: GithubIssue }> = ({ issue }) => (
  <div key={issue.number}>
    <h2>
      {issue.title}
      (<a href={`https://github.com/${issue.repo}/issues/${issue.number}`}>#{issue.number}</a>)
    </h2>
    <img src={issue.user.avatar_url} style={{ float: 'left', width: 32, borderRadius: '50%', marginRight: 20 }} />
    <i>@{issue.user.login}</i> Opened: <div style="margin-top: 10px">{issue.body}</div>
  </div>
);

const GithubIssues: FunctionComponent<{ issues: GithubIssue[]; }> = ({ issues }) => (
  <div>{issues.map(issue => <Issue key={issue.number} issue={issue} />)}</div>
);

export const activate: ActivationFunction = (context) => ({
    renderOutputItem(data, element) {
        render(<GithubIssues issues={data.json()} />, element);
    }
});
ms-vscode.github-issue-notebook/github-issue 데이터 필드가 있는 출력 셀에서 이 렌더러를 실행하면 다음과 같은 정적 HTML 보기가 제공됩니다.
컨테이너 외부의 요소 또는 기타 비동기 프로세스가 있는 경우 disposeOutputItem을 사용하여 해제할 수 있습니다. 이 이벤트는 출력이 지워지거나, 셀이 삭제되거나, 기존 셀에 대한 새 출력이 렌더링되기 전에 발생합니다. 예를 들어
const intervals = new Map();

export const activate: ActivationFunction = (context) => ({
    renderOutputItem(data, element) {
        render(<GithubIssues issues={data.json()} />, element);

        intervals.set(data.mime, setInterval(() => {
            if(element.querySelector('h2')) {
                element.querySelector('h2')!.style.color = `hsl(${Math.random() * 360}, 100%, 50%)`;
            }
        }, 1000));
    },
    disposeOutputItem(id) {
        clearInterval(intervals.get(id));
        intervals.delete(id);
    }
});
모든 노트북의 모든 출력은 동일한 iframe의 다른 요소에 렌더링된다는 점을 명심하는 것이 중요합니다. document.querySelector와 같은 함수를 사용하는 경우 다른 출력과의 충돌을 피하기 위해 관심 있는 특정 출력으로 범위를 지정해야 합니다. 이 예제에서는 해당 문제를 피하기 위해 element.querySelector를 사용합니다.
대화형 노트북(컨트롤러와의 통신)
렌더링된 출력에서 버튼을 클릭한 후 이슈의 댓글을 볼 수 있는 기능을 추가하고 싶다고 가정해 봅시다. 컨트롤러가 ms-vscode.github-issue-notebook/github-issue-with-comments mimetype 아래에 이슈 데이터와 댓글을 제공할 수 있다고 가정하면, 모든 댓글을 미리 로드하고 다음과 같이 구현할 수 있습니다.
const Issue: FunctionComponent<{ issue: GithubIssueWithComments }> = ({ issue }) => {
  const [showComments, setShowComments] = useState(false);

  return (
    <div key={issue.number}>
      <h2>
        {issue.title}
        (<a href={`https://github.com/${issue.repo}/issues/${issue.number}`}>#{issue.number}</a>)
      </h2>
      <img src={issue.user.avatar_url} style={{ float: 'left', width: 32, borderRadius: '50%', marginRight: 20 }} />
      <i>@{issue.user.login}</i> Opened: <div style="margin-top: 10px">{issue.body}</div>
      <button onClick={() => setShowComments(true)}>Show Comments</button>
      {showComments && issue.comments.map(comment => <div>{comment.text}</div>)}
    </div>
  );
};
이것은 즉시 몇 가지 주의 사항을 발생시킵니다. 첫째, 버튼을 클릭하기도 전에 모든 이슈에 대한 전체 댓글 데이터를 로드하고 있습니다. 또한 더 많은 데이터를 표시하고 싶을 뿐인데도 완전히 다른 mimetype에 대한 컨트롤러 지원이 필요합니다.
대신, 컨트롤러는 VS Code에서 iframe에도 로드할 사전 로드 스크립트를 포함하여 렌더러에 추가 기능을 제공할 수 있습니다. 이 스크립트는 postKernelMessage 및 onDidReceiveKernelMessage 전역 함수에 액세스할 수 있으며, 이를 사용하여 컨트롤러와 통신할 수 있습니다.
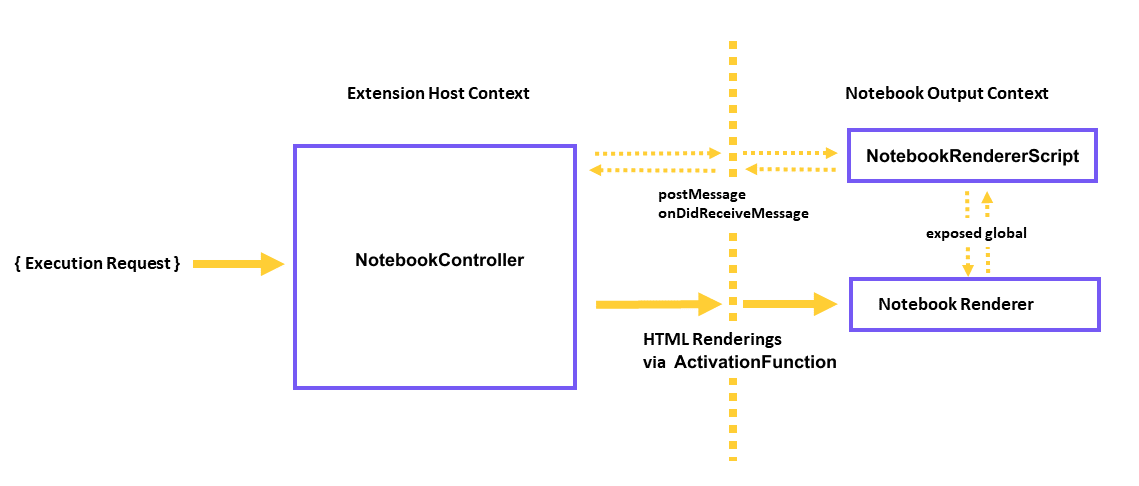
예를 들어, 컨트롤러의 rendererScripts를 수정하여 VS Code와 연결을 설정하고 렌더러에서 사용할 전역 통신 스크립트를 노출하는 새 파일을 참조할 수 있습니다.
컨트롤러에서
class Controller {
  // ...

  readonly rendererScriptId = 'my-renderer-script';

  constructor() {
    // ...

    this._controller.rendererScripts.push(
      new vscode.NotebookRendererScript(
        vscode.Uri.file(/* path to script */),
        rendererScriptId
      )
    );
  }
}
package.json에서 스크립트를 렌더러의 종속성으로 지정합니다.
{
  "activationEvents": ["...."],
  "contributes": {
    ...
    "notebookRenderer": [
      {
        "id": "github-issue-renderer",
        "displayName": "GitHub Issue Renderer",
        "entrypoint": "./out/renderer.js",
        "mimeTypes": [...],
        "dependencies": [
            "my-renderer-script"
        ]
      }
    ]
  }
}
스크립트 파일에서 컨트롤러와 통신하기 위한 통신 함수를 선언할 수 있습니다.
import 'vscode-notebook-renderer/preload';

globalThis.githubIssueCommentProvider = {
  loadComments(issueId: string, callback: (comments: GithubComment[]) => void) {
    postKernelMessage({ command: 'comments', issueId });

    onDidReceiveKernelMessage(event => {
      if (event.data.type === 'comments' && event.data.issueId === issueId) {
        callback(event.data.comments);
      }
    });
  }
};
그런 다음 렌더러에서 이를 사용할 수 있습니다. 다른 개발자가 githubIssueCommentProvider를 구현하지 않는 다른 노트북과 컨트롤러에서 GitHub 이슈 출력을 생성할 수 있으므로, 컨트롤러의 렌더 스크립트에 의해 노출된 전역이 사용 가능한지 확인해야 합니다. 이 경우 전역이 사용 가능한 경우에만 **Load Comments** 버튼을 표시합니다.
const canLoadComments = globalThis.githubIssueCommentProvider !== undefined;
const Issue: FunctionComponent<{ issue: GithubIssue }> = ({ issue }) => {
  const [comments, setComments] = useState([]);
  const loadComments = () =>
    globalThis.githubIssueCommentProvider.loadComments(issue.id, setComments);

  return (
    <div key={issue.number}>
      <h2>
        {issue.title}
        (<a href={`https://github.com/${issue.repo}/issues/${issue.number}`}>#{issue.number}</a>)
      </h2>
      <img src={issue.user.avatar_url} style={{ float: 'left', width: 32, borderRadius: '50%', marginRight: 20 }} />
      <i>@{issue.user.login}</i> Opened: <div style="margin-top: 10px">{issue.body}</div>
      {canLoadComments && <button onClick={loadComments}>Load Comments</button>}
      {comments.map(comment => <div>{comment.text}</div>)}
    </div>
  );
};
마지막으로 컨트롤러와 통신을 설정해야 합니다. NotebookController.onDidReceiveMessage 메서드는 렌더러가 전역 postKernelMessage 함수를 사용하여 메시지를 보낼 때 호출됩니다. 이 메서드를 구현하려면 onDidReceiveMessage에 연결하여 메시지를 수신합니다.
class Controller {
  // ...

  constructor() {
    // ...

    this._controller.onDidReceiveMessage(event => {
      if (event.message.command === 'comments') {
        _getCommentsForIssue(event.message.issueId).then(
          comments =>
            this._controller.postMessage({
              type: 'comments',
              issueId: event.message.issueId,
              comments
            }),
          event.editor
        );
      }
    });
  }
}
대화형 노트북(확장 호스트와의 통신)
출력 항목을 별도의 편집기 내에서 열 수 있는 기능을 추가하고 싶다고 가정해 봅시다. 이를 가능하게 하려면 렌더러가 확장 호스트로 메시지를 보낼 수 있어야 하며, 그러면 확장 호스트가 편집기를 시작합니다.
이는 렌더러와 컨트롤러가 두 개의 별도 확장 프로그램인 시나리오에 유용할 수 있습니다.
렌더러 확장 프로그램의 package.json에서 requiresMessaging의 값을 optional로 지정하면 렌더러가 확장 호스트에 액세스할 수 있는 경우와 그렇지 않은 경우 모두에 작동할 수 있습니다.
{
  "activationEvents": ["...."],
  "contributes": {
    ...
    "notebookRenderer": [
      {
        "id": "output-editor-renderer",
        "displayName": "Output Editor Renderer",
        "entrypoint": "./out/renderer.js",
        "mimeTypes": [...],
        "requiresMessaging": "optional"
      }
    ]
  }
}
requiresMessaging의 가능한 값은 다음과 같습니다.
always: 메시지가 필수입니다. 렌더러는 확장 호스트에서 실행할 수 있는 확장 프로그램의 일부인 경우에만 사용됩니다.optional: 확장 호스트가 사용 가능한 경우 메시징을 사용하면 렌더러가 더 좋습니다. 그러나 렌더러를 설치하고 실행하는 데 필수적인 것은 아닙니다.never: 렌더러는 메시징이 필요하지 않습니다.
마지막 두 옵션이 선호됩니다. 이는 렌더러 확장 프로그램이 확장 호스트를 반드시 사용할 수 없는 컨텍스트로 이식 가능하도록 보장하기 때문입니다.
렌더러 스크립트 파일은 다음과 같이 통신을 설정할 수 있습니다.
import { ActivationFunction } from 'vscode-notebook-renderer';

export const activate: ActivationFunction = (context) => ({
  renderOutputItem(data, element) {
    // Render the output using the output `data`
    ....
    // The availability of messaging depends on the value in `requiresMessaging`
    if (!context.postMessage){
      return;
    }

    // Upon some user action in the output (such as clicking a button),
    // send a message to the extension host requesting the launch of the editor.
    document.querySelector('#openEditor').addEventListener('click', () => {
      context.postMessage({
        request: 'showEditor',
        data: '<custom data>'
      })
    });
  }
});
그런 다음 확장 호스트에서 다음과 같이 해당 메시지를 사용할 수 있습니다.
const messageChannel = notebooks.createRendererMessaging('output-editor-renderer');
messageChannel.onDidReceiveMessage(e => {
  if (e.message.request === 'showEditor') {
    // Launch the editor for the output identified by `e.message.data`
  }
});
참고
- 확장 프로그램이 메시지가 전송되기 전에 확장 호스트에서 실행되도록 하려면
activationEvents에onRenderer:<your renderer id>를 추가하고 확장 프로그램의activate함수에서 통신을 설정하십시오. - 렌더러 확장 프로그램에서 확장 호스트로 보내는 모든 메시지가 전송된다는 보장은 없습니다. 사용자가 렌더러의 메시지가 전송되기 전에 노트북을 닫을 수 있습니다.
디버깅 지원
프로그래밍 언어를 구현하는 것과 같은 일부 컨트롤러의 경우 셀 실행을 디버깅할 수 있도록 하는 것이 바람직할 수 있습니다. 디버깅 지원을 추가하려면 노트북 커널이 디버그 어댑터를 구현해야 합니다. 디버그 어댑터 프로토콜(DAP)을 직접 구현하거나 기존 노트북 디버거에 프로토콜을 위임하고 변환하여 구현할 수 있습니다(예: 'vscode-simple-jupyter-notebook' 샘플에서 수행된 대로). 훨씬 간단한 접근 방식은 수정되지 않은 기존 디버그 확장 프로그램을 사용하고 디버거 프로토콜을 동적으로 노트북 요구 사항에 맞게 변환하는 것입니다('vscode-nodebook'에서 수행된 대로).
샘플
- vscode-nodebook: VS Code의 빌트인 JavaScript 디버거와 간단한 프로토콜 변환을 통해 디버깅 지원을 제공하는 Node.js 노트북
- vscode-simple-jupyter-notebook: 기존 Xeus 디버거를 통해 디버깅 지원을 제공하는 Jupyter 노트북